NodeJS loopback RESTful API
Modern web and mobile apps often need to access backend servers using RESTful APIs. In this tutorial, you will learn to create a NodeJS loopback restful API with authentication. A bookstore API is created using Nodejs, MongoDB, and loopback. After that token based authenticated API is created. In a previous tutorial, we explored how to create NodeJS MongoDB RESTful API.
What is the loopback?
Loopback is an extensible nodejs framework. You can create dynamic APIs with loopback very easily.
Using Loopback you can
Setup token based authentication
Create data models for database

In this tutorial, following tasks are performed to create a nodejs loopback restful API
Install and run MongoDB, NodeJS, and NPM
Install loopback-cli module
Create a NodeJS loopback RESTful API
Create a new user
Login and logout a user
Setup token for authenticated requests
Create a Book Model
Fetch books information using Get HTTP method
Create a book using a POST HTTP method with a token
Install and run MongoDB
In this nodejs loopback RESTful API, MongoDB database is used. To install MongoDB, visit MongoDB website, download and install it. For more information on setting up MongoDB locally, read this article.
Install NodeJS and NPM
Next, install NodeJS. Visit nodejs website, download and install. NPM is also installed with NodeJS installation. NPM is package manager for nodejs applications. Using NPM, packages and modules are installed.
Install loopback cli module
In order to create a nodejs loopback restful API, you need to install loopback cli module. Open command line and type.
npm i -g loopback-cli
Create nodejs loopback restful API
To create nodejs loopback restful API, lb command is used. On command line type
lb
This command opens a wizard on the command line. Select the options given below.

Enter the name of the application as nodejs-loopback-restful-API, the name of the directory is the same as the application.
Select loopback latest version. For kind of application select api-server. Next, select default options.

Loopback is installed with required dependencies. Change the directory using cd nodejs-loopback-restful. To run the application, type
node .
To view the running application, open browser, and type URL.
http://localhost:3000

You can view the output as a timestamp and uptime. To browse the nodejs loopback RESTful API, open /explorer route
http://localhost:3000/explorer
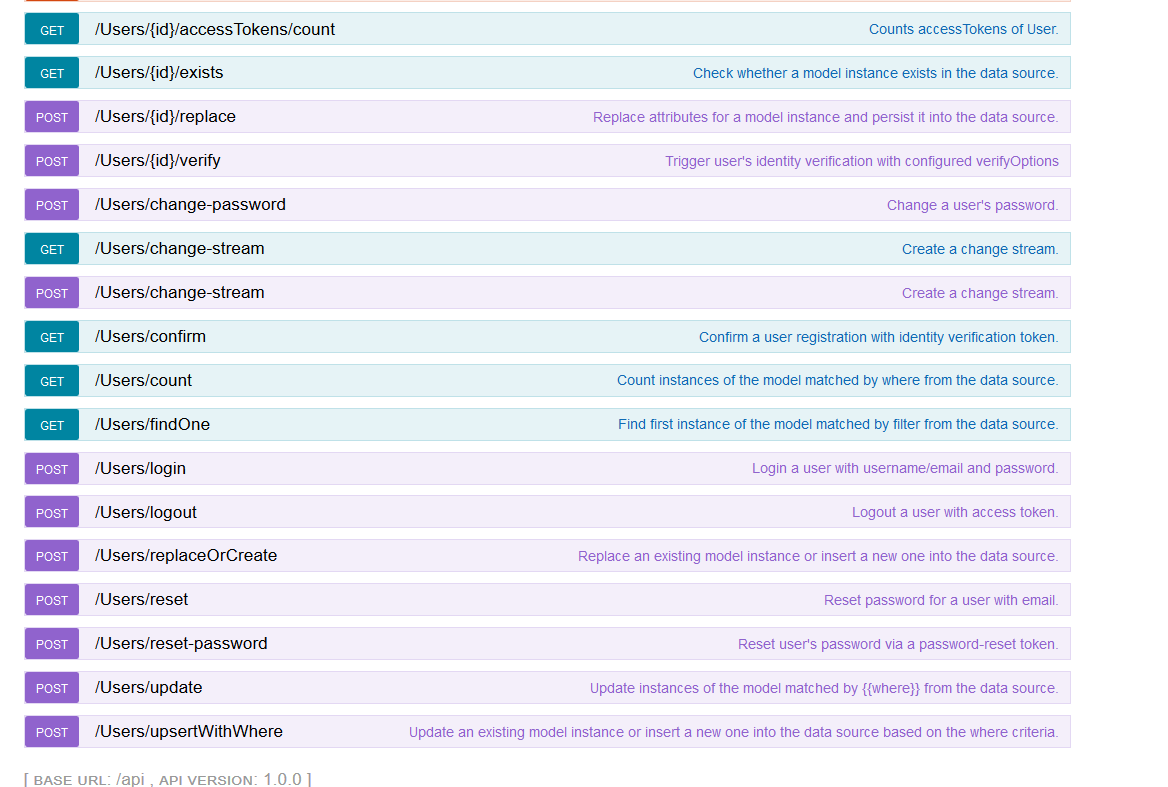
Nodejs loopback restful API explorer
You can view API, a User model with RESTful endpoints are created. Click on Users link and you can see all the requests with GET, PUT, POST, DELETE, PATCH HTTP methods. These requests are generated by loopback.
Loopback also provides login, logout, and user creation methods. Authentication can also be added to methods. If you start developing these methods with NodeJS and Express, it would be very complex and consumes a lot of time.

The file structure of the project
Open project in your favorite IDE such as Sublime text, Atom or Brackets. You can view different directories and files like the client, common, server, and package.json.

Server directory contains boot folder, that has authenticates.js and root.js files. Other important files are config.json, datasource.json, and model-config.json.
Open datasource.json in the server directory. The default data source is the memory. MySQL, MongoDB, Redis, PostgreSQL and more can be used. In this tutorial, MongoDB data source is used.
Create a MongoDB connector
In the datasource.json directory, you can view current db settings as memory. As Loopback RESTful API connects to MongoDB. A MongoDB connector is added.
{
"db": {
    "name": "db",
    "connector": "memory"
  }
}
To add MongoDB as the connector, type following command on CLI.
$ npm install --save loopback-connector-mongodb
After adding MongoDB connector, let us add MongoDB data source.
Add MongoDB data source
To add MongoDB data source, type command.
$ lb datasource mongoDS --connector mongoDB
In the command above data source name is mongoDS, with –connector flag, MongoDB is added. As you press enter, a wizard is run.
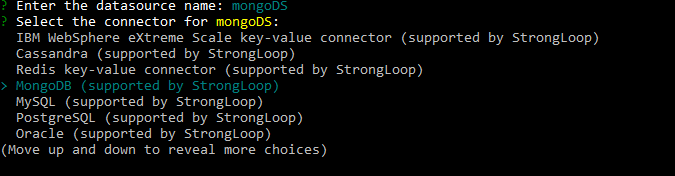
Name of a data source is mongoDS. Select the connector as MongoDB. There are other choices like Mysql, Oracle. PostgreSQL, Redis, and Cassandra etc.

Fro connection string, enter host as localhost, port as 27017, leave user and password as blank. Enter books as the database. If you open datasource.json, mogoDS config settings can be seen in the file.
"mongoDS": {
    "host": "localhost",
    "port": 27017,
    "url": "",
    "database": "books",
    "password": "",
    "name": "mongoDS",
    "user": "",
    "connector": "mongodb"
  }
remove default db datasource and add the new mongDS config to db.
"db": {
    "host": "localhost",
    "port": 27017,
    "url": "",
    "database": "books",
    "password": "",
    "name": "mongoDS",
    "user": "",
    "connector": "mongodb"
  }
In other files like model.config.js, db datasource is referred a default data source. Now MongoDB is connected with API.
Create a model for book
In this tutorial, a bookstore API is created so a model is created with the name book.
lb model
A wizard runs and it asks for the model name as the book, connector to attach is db connector, the model class is PersistedModel. This model is going to be exposed via a RESTful API.

Next is to add properties to the book model.
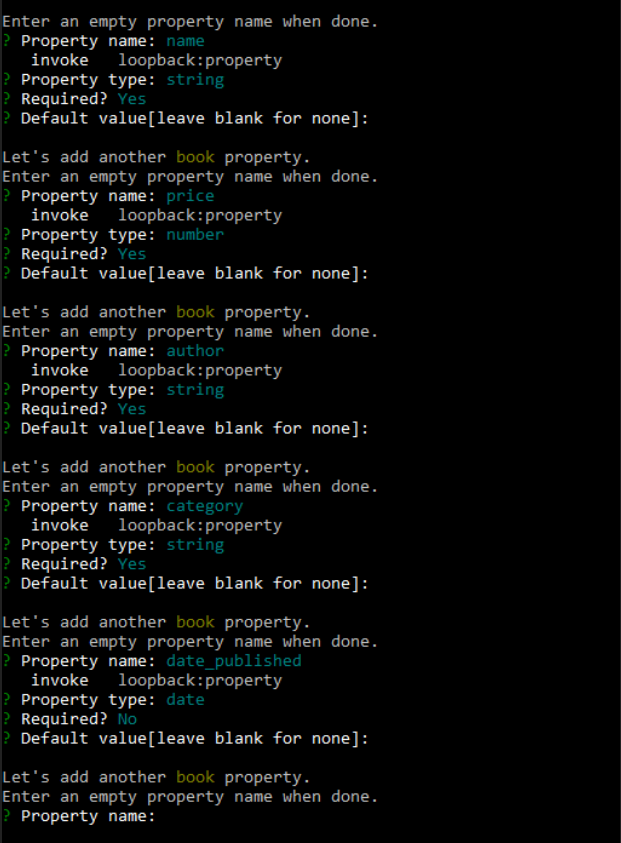
Book model is going to have name, author, category as the string, price as the number date_published as date property. When you are done with adding properties, Press enter key and wizard ends.
If you open common directory, there is a model directory created, with a book.js and book.json files. In the book.json file, you can view all the properties that are added while creating the model. If you restart the server. Open the browser and go to URL explorer
http://localhost:3000/explorer
You can see the book model link.
Nodejs loopback restful API book route
Click on book route. All HTTP methods available for a book can be viewed.

HTTP methods required for add, edit, delete or view books are added by API.
View books GET method
Click on GET /books route. On-screen click on Try it out button. A request is sent to the route
http://localhost:3000/api/books
Response code 200 and empty array is returned as result. The empty response is returned because no books are present in the database.


Add a new book using nodejs loopback restful API
Let us add a new book using loopback API. Click on POST /Books method. In data textarea, add book information. Click on Try It Out button. After Book is added successfully. A response code 200 and new generated Id is returned.

Book model has name, price, author, category, and date published fields.
Click on GET /books method and then on Try it out, You can view the newly added book. If you open MongoDB command line and type
show dbs
It will show all databases in MongoDB. Type command use books, the database is changed to books. Type show tables. Then type command
db.mongodb.find().pretty();

Using API, requests can be made to Book and User methods.
Add ACL or Access Control List to book model
To restrict access to add, edit, delete or display information to the authenticated users only, ACL feature can be added. Go to the command line and type
lb acl
ACL is applied to the book model’s methods and properties. 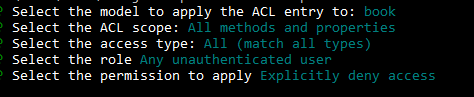
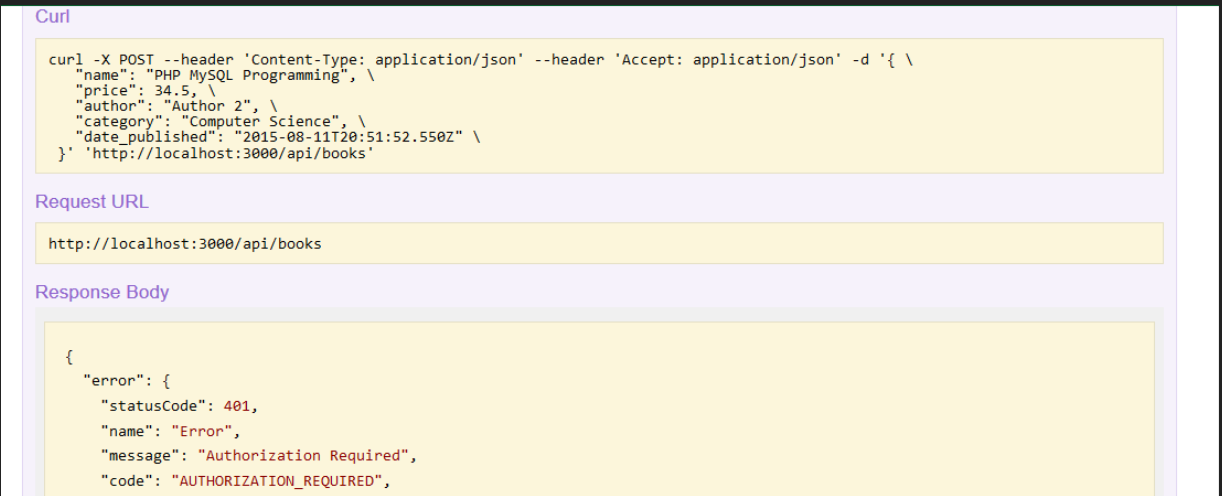
Open GET /books route and click on Try it out. A 401 response code with a message Authorization Required is returned.
Using any other method, same 401 response is returned. The application needs an access token to perform requests. So a user is logged in and access token is sent back. The token is set for all subsequent requests. Implementing token-based authentication for HTTP method is very easy using Loopback API.
Add a new user
Click on Post /Users route. In data, textarea add a user email as admin@example.com and password as 12345. Click on Try it out.
{

  "email": "admin@example.com",

  "password": "12345"

}

The response code 200 and user email and id returned.

Login using nodejs loopback restful API
Click on Users /POST login route. Enter user credentials as a JSON in textarea.
{
   "email": "admin@example.com",
   "password": "12345"
}
Click Try it out, If the user is login is successful a response code 200 and an access token is returned.


Id field contains token. Copy access token and paste it in the textbox. Click on Set AccessToken.
Set access token for the API

After the token is set the message Token not set is changed to Token Set.

Get Books with Access Token
Click on GET /Books route and Click on Try it out. Books data can be viewed.

Logging out of the API
Click on User /logout method. Click on Try it out. User is logged out.

If you access GET /books or POST books route, a message Authorization Required is returned.
Ideally, the user should view books without any authentication. But can add, edit, delete books after authentication.
Update ACL for the book model
All unauthenticated users are denied access to the Book Model. Only Write operations should be denied access. On the command line, type command.
lb acl

Select access type as Write, role to any unauthenticated user and permission to explicitly deny access.
GET Books List
Open GET /Book route. You can view books list without login, but you will not be able to add, edit or delete a book.
Login, set access token and add a book
Open Users/login, After login, copy the new access token and set in the textbox. Next, open POST /Books. Add a new book and click on Try It Out. A new book as added successfully and a response code 200 is returned to the user.
Summary
To summarize, in this nodejs loopback restful API tutorial, you learned to create an app using loopback commands. Created a model and performed CRUD operations using API
You can download or clone the tutorial code from this GitHub repository.
Thanks for the reading tutorial, Leave your feedback, follow us on Twitter, like our Facebook page or subscribe to our newsletter.
Related Articles
- NodeJs MongoDB Tutorial
- Using socketio with nodejs
- NodeJs user registration tutorial
- NodeJS MongoDB RESTful API
- Nodejs File Upload With MongoDB – Photo Gallery
- SOAP Web Services in PHP
- Restful Web Services in CodeIgniter
Previous Article
Next Article