Create nodejs twitter login with PassportJS
Nowadays modern web applications have social media login as an important feature. Instead of login using an email address, users prefer to sign in with popular social media sites like Facebook or Twitter. In a previous tutorial, NodeJS PassportJS Login was explored with passport local strategy. In this tutorial, you will learn nodejs twitter login.
Following tasks are performed in this tutorial.
1. Create a NodeJS, expressjs application
2. Install passport, passport-twitter, express-session modules
3. Install nodemon and session memory store modules
3. Create a twitter developer app on http://dev.twitter.com
4. Create a passport twitter login strategy
5. Create a login button in the index view file
6. Perform login using twitter authentication

Generate a NodeJS application using express.
In order to generate a nodejs twitter login application, you need to install nodejs, npm, and expressjs.
Install NodeJS and NPM
To install NodeJS, visit nodejs.org website. Download installer. After downloading, run the installer. It is a simple wizard-based process. NPM or Node Package Manager is also installed. NPM is used to install dependencies and packages.
Install express generator command line tool.
After NodeJS and NPM installation, install express-generator. This tool is used to generate an express application skeleton.
$ npm install express-generator -g
Generate an express application using express tool
$ express --view=pug nodejs-twitter-login-with-passport

Install required dependencies
Before running the app, you need to install required dependencies.
> cd nodejs-twitter-login-with-passport && npm install
This command changes directory to project folder and installs required dependencies.
Running the app
To view running app, execute the command below.
SET DEBUG=nodejs-twitter-login-with-passport:* & npm start
Open the browser and type URL.
http://localhost:3000
Install nodemon module
If a change is made to a nodejs file, you need to restart the server. Nodemon service monitors changes in nodejs files and automatically restart the server.
npm install --save-dev nodemon
On command line and type
nodemon
Install passport, passport-twitter, express-session
Passport, passport-twitter modules are required to perform login, while the express-session module is used to create a session middleware.
npm install passport passport-twitter express-session --save
Install session memory store
Install session-memory-store module, this module is a session store.
npm install session-memory-store --save
Create a twitter developer app
To create a Twitter Developer App, you need to create an account on Twitter. After creating the account, login to your account. Visit https://apps.twitter.com/ URL and click on Create New App button. If you have no apps already you will view a screen like this. Click on Create New App button.

Create an application screen displays

Fill in the appropriate fields like name, description, website (The website where you would like to use this app, in this case, localhost is our website).
Next, an important field is Callback URL. This URL is, where Twitter will return after successful authentication. Here URL is http://127.0.0.1/twitter/callback. You need to create the same route for you nodejs twitter login app.
After adding the information, click on Create Your Twitter Application button. 
After your Twitter app is created, you will see the success message. Now click on Keys and Access Tokens. Here you need to get Consumer Key (API Key) and Consumer Secret (API Secret). These keys are used in app.

You need to keep token and access keys secret.
Here we have hidden the keys due to security/privacy reasons
Create a passport twitter login strategy
Open project in your favorite IDE such as Sublime Text, Atom or Visual Studio Code.
Update code in App.js
Open app.js file and replace all code with the code present in the following link:
https://github.com/programmer-blog/nodejs-twitter-login/blob/master/app.js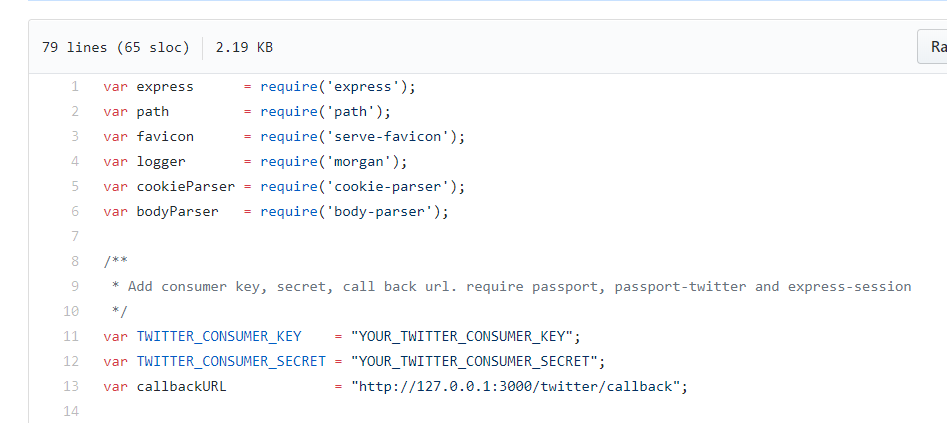
Add access keys
Open file app.js. Add following code on top of the file after require statements.
var TWITTER_CONSUMER_KEY    = "YOUR APP CONSUMER KEY";
var TWITTER_CONSUMER_SECRET = "YOUR APP CONSUMER SECRET";
var callbackURL = "http://127.0.0.1:3000/twitter/return";
Include required modules
After setting keys in application add require statement for passport, passport-twitter and express-session modules.
var passport = require('passport');

var TwitterStrategy = require('passport-twitter').Strategy;

var sess            = require('express-session');
Include session memory store
Include session memory store
var BetterMemoryStore = require('session-memory-store')(sess);
Create passport twitter strategy
Below, require statements in app.js, add twitter strategy in app.use. Add consumer key, secret and callback URL.
passport.use(new TwitterStrategy({

  consumerKey:    TWITTER_CONSUMER_KEY,

  consumerSecret: TWITTER_CONSUMER_SECRET,

  callbackURL:    callbackURL
},
  function(token, tokenSecret, profile, done) {

    done(null, profile);

  }

));
Serialize and deserialize information
To fetch and save user data in memory, you need to serialize it first and then deserialize it.
passport.serializeUser(function(user, callback){

  callback(null, user);

});

passport.deserializeUser(function(object, callback){

  callback(null, object);

});
Add session configuration options
To use session in this app add session configuration options
var store = new BetterMemoryStore({ expires: 60 * 60 * 1000, debug: true });

app.use(sess({
  name: 'JSESSION',
  secret: 'MYSECRETISVERYSECRET',
  store:  store,
  resave: true,
  saveUninitialized: true,
}));
Initialize passport and session
To use passport and passport session, initialize it.
app.use(passport.initialize());

app.use(passport.session());
Add ‘/’ route for nodejs twitter login
Add a ‘/’ route that will be loaded when the application is loaded. This route renders index route. User data from Twitter, is saved in req.user and title is also assigned to title variable, data is passed to index view.
app.get('/', function(req, res){

  res.render('index', {user: req.user, title: "Nodejs Twitter Login with PassportJs and ExpressJs"});

});
Add login and callback return routes
Next, add twitter/login route, that authenticates the user, using passport.authenticate method. After login, twitter/return route is defined, in case of success user is redirected to ‘/’ and user information is assigned to view otherwise if user authentication is failed, the user is redirected to a failureRedirect route.
app.get('/twitter/login', passport.authenticate('twitter'));

app.get('/twitter/return', passport.authenticate('twitter', {

  failureRedirect : '/'

}),

  function(req, res){

    res.redirect('/')

  });
Add index View to routes folder
Open index.pug file in routes directory. Add the code below to the file. This code creates a table, displays a Twitter login button. If the user is logged in successful, username and twitter profile photo is displayed.
extends layout

block content
  .container
    .row
       .col-sm-12
          table.table.table-hover
            thead
              tr
                th
                  h1 #{title}
            tbody
              tr
                td
                   if user
                    strong Welcome:
                    | #{user.displayName}
                    br
                    strong Display Photo:
                    img(src="#{user.photos[0].value}", alt="")
                   else
                     a(class ="btn btn-primary" href="/twitter/login")
                      | Login With Twitter
Related CSS styles and layout.pug file code can be found in source code.
Running the application
Open the browser and go to URL http://127.0.0.1:3000

Click on Login With Twitter button. The app will be redirected to a twitter login screen.

This screen also shows permissions, that this app will have access to.

After sign in, App needs authorization. Click on Authorize App. You can see display name and profile photo of user from twitter.

Summary
In this tutorial, you learned to create a nodejs twitter login app. Passport, passport-twitter, nodemon, express-session modules are installed. A twitter developer app is created on apps.twitter.com. After the user is successfully logged in to account, user information is returned from Twitter and is displayed on homepage.
You can clone or download the source code of this tutorial from Github.

Please follow us on Twitter, like us on Facebook or subscribe to our newsletter.
Related Articles
- NodeJS PassportJS Login
- NodeJS send email tutorial
- NodeJS MongoDB RESTful API
- Generate RSS Feed using NodeJS
- Using socketio with nodejs
Previous Article
Next Article: