Angular Material UI Tutorial with NGRX
In this Angular Material UI Tutorial with NGRX, we will build an Angular 18 application using NGRX for state management and Angular Material 3 for the user interface. We will fetch data from a mock API using JSONPlaceholder and demonstrate how to implement actions, reducers, and effects for managing state in Angular. The tutorial will utilize standalone components, a feature introduced in Angular 18, making the process streamlined and modular.
By the end of this Angular Material UI Tutorial with NGRX, you will:
- Understand how to integrate NGRX into an Angular project.
- Learn how to use standalone components with Angular Material 3.
- Set up actions, reducers, and effects for NGRX.
- Fetch and display user data using NGRX and Angular Material components.
Prerequisites:
- Basic knowledge of Angular and TypeScript.
- Node.js and Angular CLI installed on your machine.
.

Table of Contents
- Project Setup with Standalone Components
- Installing Dependencies: NGRX and Angular Material
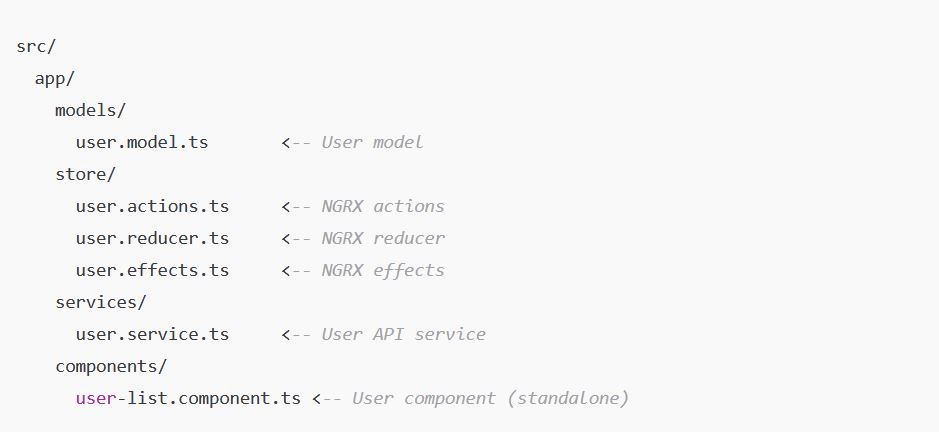
- Folder Structure for Standalone Angular 18
- Creating the User Model
- Setting Up NGRX (Actions, Reducers, and Effects)
- Creating the User Service
- Building the User Component with Angular Material 3
- Configuring the Main Application Component
- Running the Application
- Conclusion
1. Project Setup with Standalone Components
This section covers setting up a new Angular project using standalone components, which is a simpler and more modular approach introduced in Angular 18.
1.1 Install Angular CLI
If you haven’t installed Angular CLI globally yet, run the following command:
npm install -g @angular/cli
1.2 Create a New Angular Project with Standalone Components
We will create a new Angular 18 project with standalone components enabled:
ng new angular-ngrx-material-tutorial --standalone
This command will create a new Angular project using standalone components instead of the traditional NgModule system. Once the project is generated, navigate into the project folder:
cd angular-ngrx-material-tutorial
2. Installing Dependencies: NGRX and Angular Material
2.1 Install NGRX
NGRX helps manage complex state in Angular applications. Install the NGRX packages:
npm install @ngrx/store @ngrx/effects @ngrx/store-devtools

npm install @angular/platform-browser @angular/common @types/node --save
2.2 Install Angular Material 3
To style our application with Material Design, install Angular Material:
ng add @angular/material
ng add @angular/material
When prompted:
Choose a theme (e.g., Indigo/Pink).
Enable global typography and animations.
3. Folder Structure for Standalone Angular 18
Inside the src/app/ folder, create the following structure to keep the project organized:

This structure will help organize our code as we develop the application.
4. Creating the User Model
The User model defines the structure of the user data. We will use this model across NGRX actions, reducers, and the component to display data.
In the models/ folder, create user.model.ts
export interface User {
  id: number;
  name: string;
  email: string;
}
This User interface includes:
id: A unique identifier for the user.
name: The user’s full name.
email: The user’s email address.
5. Setting Up NGRX (Actions, Reducers, and Effects)
5.1 Creating Actions
NGRX actions represent events that trigger state changes. In the store/ folder, create user.actions.ts
import { createAction, props } from '@ngrx/store';
import { User } from '../models/user.model';

export const loadUsers = createAction('[User List] Load Users');
export const loadUsersSuccess = createAction('[User List] Load Users Success', props<{ users: User[] }>());
export const loadUsersFailure = createAction('[User List] Load Users Failure', props<{ error: any }>());
These actions represent the different states of our user data loading process:
loadUsers: Initiates the user data loading.
loadUsersSuccess: Carries the loaded user data on success.
loadUsersFailure: Handles the error if loading fails.
5.2 Creating Reducers
Reducers handle the actual state change. In the store/ folder, create user.reducer.ts
// src/app/store/user.reducer.ts
import { createReducer, on } from '@ngrx/store';
import { loadUsers, loadUsersSuccess, loadUsersFailure } from './user.actions';
import { User } from '../models/user.model';

export interface UserState {
  users: User[]; // Array of users
  error: any;
}

const initialState: UserState = {
  users: [],      // Start with an empty array
  error: null
};

export const userReducer = createReducer(
  initialState,
  on(loadUsers, (state) => ({ ...state })), // No change to state on loadUsers
  on(loadUsersSuccess, (state, { users }) => ({ ...state, users })), // users should be an array here
  on(loadUsersFailure, (state, { error }) => ({ ...state, error }))
);
5.3 Creating Effects
NGRX effects handle side effects like making HTTP requests. In the store/ folder, create user.effects.ts
// src/app/store/user.effects.ts
import { Injectable } from '@angular/core';
import { Actions, createEffect, ofType } from '@ngrx/effects';
import { inject } from '@angular/core';
import { UserService } from '../services/user.service';
import { loadUsers, loadUsersSuccess, loadUsersFailure } from './user.actions';
import { catchError, map, mergeMap } from 'rxjs/operators';
import { of } from 'rxjs';

@Injectable()
export class UserEffects {
  // Use `inject()` instead of constructor-based injection
  private actions$ = inject(Actions);
  private userService = inject(UserService);

  loadUsers$ = createEffect(() =>
    this.actions$.pipe(
      ofType(loadUsers),
      mergeMap(() =>
        this.userService.getUsers().pipe(
          map((users) => loadUsersSuccess({ users })), // Ensure `users` is an array here
          catchError((error) => of(loadUsersFailure({ error })))
        )
      )
    )
  );
}
This effect listens for the loadUsers action, fetches the user data via UserService, and dispatches either the loadUsersSuccess or loadUsersFailure action.
6. Creating the User Service
We will now create a service that fetches user data from a mock API. In the services/ folder, create user.service.ts:
// src/app/services/user.service.ts
import { Injectable } from '@angular/core';
import { HttpClient } from '@angular/common/http';
import { Observable } from 'rxjs';
import { User } from '../models/user.model';

@Injectable({ providedIn: 'root' })
export class UserService {
  private apiUrl = 'https://jsonplaceholder.typicode.com/users';

  constructor(private http: HttpClient) {}

  getUsers(): Observable<User[]> {
    return this.http.get<User[]>(this.apiUrl); // Ensure this returns an array
  }
}
This service uses HttpClient to fetch the user data from JSONPlaceholder and returns the data as an observable.
7. Building the User Component with Angular Material 3
Now we will create the User List component using Angular’s standalone components and Angular Material for the UI.
In the components/ folder, create user-list.component.ts
// user-list.component.ts
import { Component, OnInit, inject } from '@angular/core';
import { Store } from '@ngrx/store';
import { UserState } from '../store/user.reducer';
import { loadUsers } from '../store/user.actions';
import { Observable } from 'rxjs';
import { User } from '../models/user.model';
import { MatTableDataSource } from '@angular/material/table'; // Import MatTableDataSource

// Import Angular Material Modules
import { MatTableModule } from '@angular/material/table';
import { MatButtonModule } from '@angular/material/button';
import { MatCardModule } from '@angular/material/card';
import { CommonModule } from '@angular/common';

@Component({
  selector: 'app-user-list',
  standalone: true,
  templateUrl: './user-list.component.html',
  styleUrls: ['./user-list.component.scss'],
  imports: [MatTableModule, MatButtonModule, MatCardModule, CommonModule], // Import necessary modules here
})
export class UserListComponent implements OnInit {
  private store = inject(Store<UserState>);
  dataLoaded = false;

  // Create a MatTableDataSource instance
  dataSource = new MatTableDataSource<User>();
  displayedColumns: string[] = ['id', 'name', 'email'];

  ngOnInit(): void {
    // Subscribe to users$ to update the dataSource
    this.store.select((state) => state.users.users).subscribe((users) => {
      if (users) {
        this.dataSource.data = users; // Set data for MatTableDataSource
      }
    });
  }

  loadUsers() {
    this.store.dispatch(loadUsers());
    this.dataLoaded = true;
  }
}
- in the ngoninit method. The store.select method updates the Material Table data source with user data from the store whenever
usersstate changes. - loadUsers(): Dispatches the
loadUsersaction when clicked, triggering the data loading process.
7.1 In the components/ folder, create user-list.component.html:
<mat-card>
    <!-- Site Header with centered Load Users button -->
    <header class="site-header">
      <span class="site-name">Programmer Blog</span>
      <button mat-raised-button color="primary" (click)="loadUsers()" [disabled]="dataLoaded" class="header-button">
        Load Users
      </button>
    </header>

    <!-- Display Angular Material Table once data is loaded -->
    <div class="table-container" *ngIf="dataLoaded">
      <table mat-table [dataSource]="dataSource" class="mat-elevation-z8">
        <!-- ID Column -->
        <ng-container matColumnDef="id">
          <th mat-header-cell *matHeaderCellDef> ID </th>
          <td mat-cell *matCellDef="let user"> {{user.id}} </td>
        </ng-container>

        <!-- Name Column -->
        <ng-container matColumnDef="name">
          <th mat-header-cell *matHeaderCellDef> Name </th>
          <td mat-cell *matCellDef="let user"> {{user.name}} </td>
        </ng-container>

        <!-- Email Column -->
        <ng-container matColumnDef="email">
          <th mat-header-cell *matHeaderCellDef> Email </th>
          <td mat-cell *matCellDef="let user"> {{user.email}} </td>
        </ng-container>

        <!-- Header and Row Declarations -->
        <tr mat-header-row *matHeaderRowDef="displayedColumns"></tr>
        <tr mat-row *matRowDef="let row; columns: displayedColumns;"></tr>
      </table>
    </div>

    <!-- Footer Section -->
    <footer class="site-footer">
      <span>© 2023 Programmer Blog</span>
    </footer>
  </mat-card>
7.2 In the components/ folder, create user-list.component.scss:
/* Style for the site header */
.site-header {
    display: flex;
    justify-content: space-between;
    align-items: center;
    padding: 16px;
    font-size: 18px;
    font-weight: bold;
    background-color: #f5f5f5;
    border-bottom: 1px solid #ddd;
    position: relative;
}

.site-name {
    font-size: 20px;
}

.header-button {
    position: absolute;
    left: 50%;
    transform: translateX(-50%);
    background-color: #e0e0e0 !important;
    border-radius: 8px;
}

/* Style the table container to limit width and height */
.table-container {
    max-width: 80%;
    /* Limit the width of the table */
    margin: 20px auto;
    /* Center the table on the page with top and bottom margin */
    overflow: auto;
}

.mat-card {
    padding: 20px;
    margin: 20px auto;
    max-width: 90%;
}

table {
    width: 100%;
}

.mat-header-cell,
.mat-cell {
    padding: 8px 16px;
    /* Add padding to cells */
}

.mat-elevation-z8 {
    max-height: 500px;
    /* Limit table height */
    overflow-y: auto;
    /* Enable scrolling if content overflows */
}

/* Footer styling at the bottom of the card */
.site-footer {
    text-align: center;
    padding: 10px;
    font-size: 14px;
    color: #666;
    border-top: 1px solid #ddd;
    margin-top: 20px;
    /* Separate footer from table */
}
8. Configuring the Main Application Component
In Angular 18 standalone components, we don’t need a traditional NgModule. Instead, we configure the app using bootstrapApplication.
In src/main.ts, configure the app like this:
This file:
Bootstraps the AppComponent as the root component.
Registers the NGRX store and effects.
Includes HttpClient for making API requests.
8.1 Add code below to main.ts
import { bootstrapApplication } from '@angular/platform-browser';
import { provideHttpClient } from '@angular/common/http';
import { provideStore } from '@ngrx/store';
import { provideEffects } from '@ngrx/effects';
import { userReducer } from './app/store/user.reducer';
import { UserEffects } from './app/store/user.effects';
import { AppComponent } from './app/app.component';

bootstrapApplication(AppComponent, {
  providers: [
    provideHttpClient(),
    provideStore({ users: userReducer }),
    provideEffects([UserEffects]), // Ensure UserEffects is provided here
  ],
});
8.2 Add code below to app.component.ts
import { Component } from '@angular/core';
import { RouterOutlet } from '@angular/router';
import { UserListComponent } from './components/user-list.component';

@Component({
  selector: 'app-root',
  standalone: true,
  imports: [RouterOutlet, UserListComponent],
  template: `<app-user-list></app-user-list>`,
  styleUrl: './app.component.scss'
})
export class AppComponent {
  title = 'angular-ngrx-material-tutorial';
}
9. Running the Application
Start the application using:
ng serve
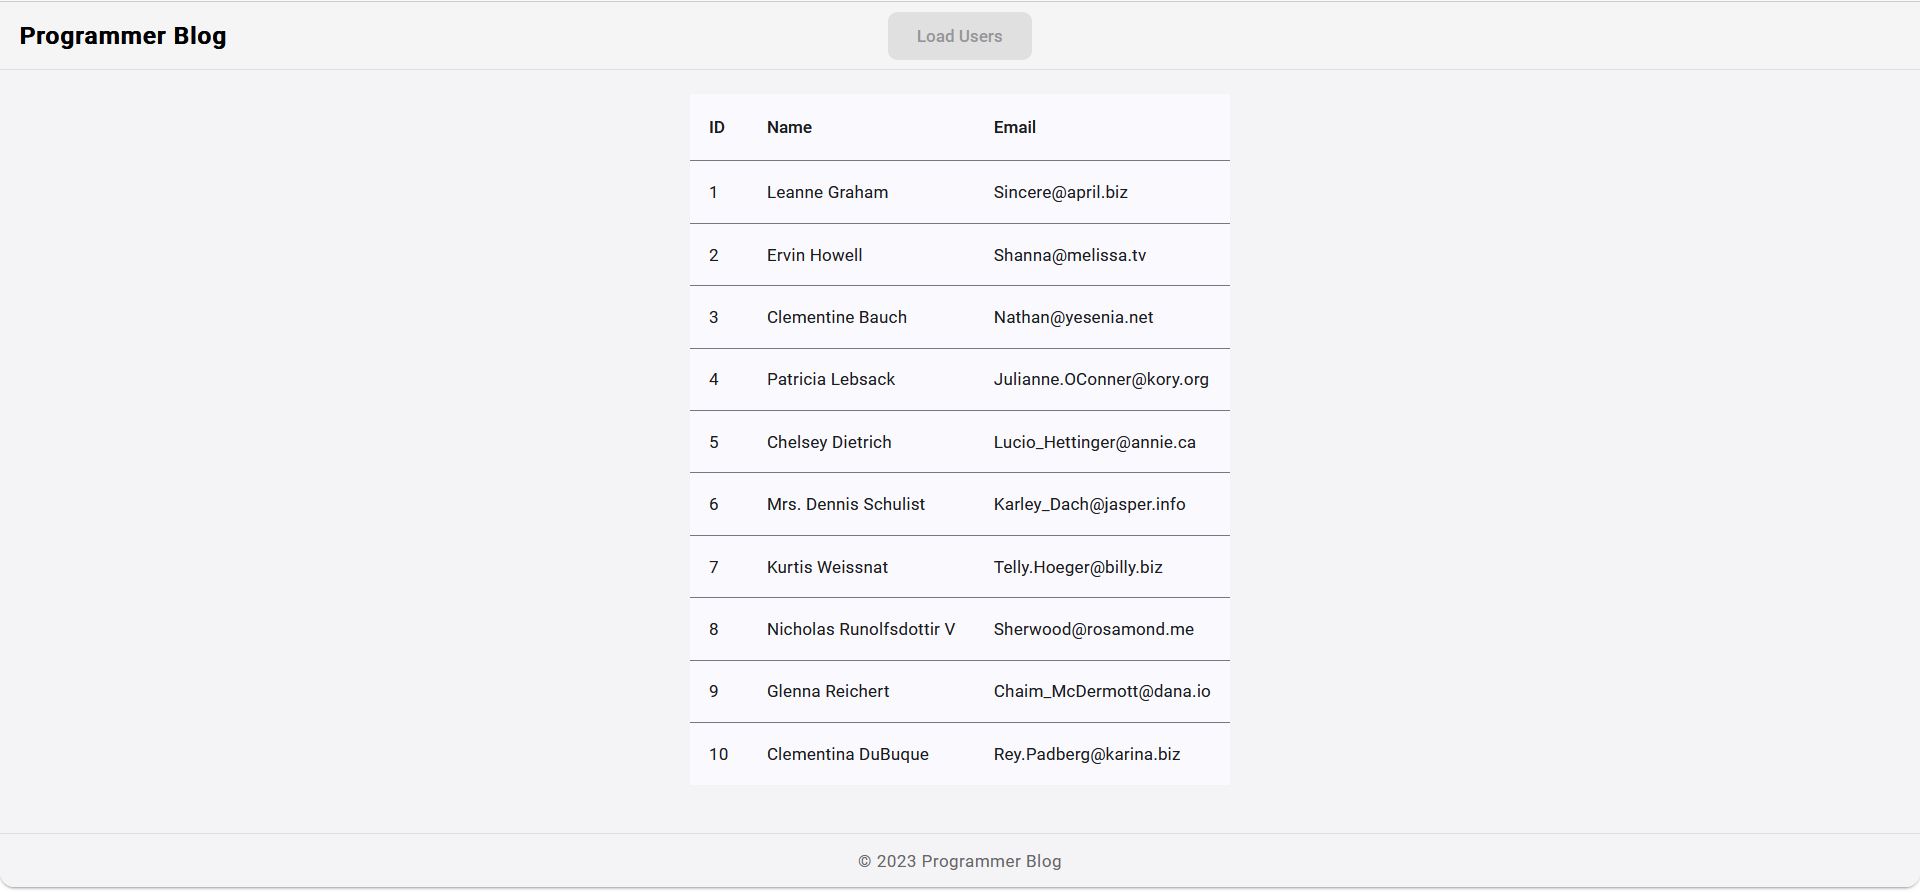
Visit http://localhost:4200 in your browser. You should see the Load Users button. Once clicked, the user data will be fetched from the mock API and displayed in the list using Angular Material UI.
The initial screen for the project.

When user clicks on the Load Users. the below screen displays the list of users.

10. Conclusion
In this Angular Material UI Tutorial with NGRX, we created a full Angular 18 app using standalone components for simplicity and modularity. We learned how to set up NGRX for state management, handled actions, reducers, and effects, and fetched data from a mock API. Using Angular Material 3, we styled our UI and presented the user data in a clean, responsive interface.
You can download the source code of the tutorial from our GitHub repository.
This Angular Material UI Tutorial with NGRX has shown how powerful and streamlined Angular 18’s new features are, making state management with NGRX easier to integrate into modern web apps.
Related Articles:
- Angular tutorial with CodeIgniter RESTful API – part 1
- What is Front-End Development? Become A Front-End Developer
- What is Devops? All You Need To Know About Development Operations
Previous Article
 Best Tech Blog For Programming Articles And Video Tutorials Code Is Easy
