How to manipulate images and work with GD library in PHP
Graphics are used to make a website more beautiful and you can use many tools like Adobe Photoshop for that but in a lot of places, we need dynamic image manipulation. For this purpose, we can use GD library in PHP. In this article, you will learn how to manipulate images and work with GD library in PHP. You can open, save or draw images on a canvas, create a thumbnail of a large image or can add watermark and many other effects.

Colors theory and coordinate system
Before working in GD library let us explore colors theory and coordinate system. The computer is the world of colors. As you have seen many color monitors. The computer uses a Color Theory Model that is called RGB or red, green, blue. A computer creates colors by using these basic colors.
Co-ordinate System
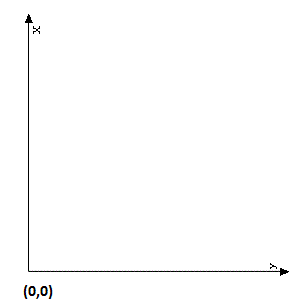
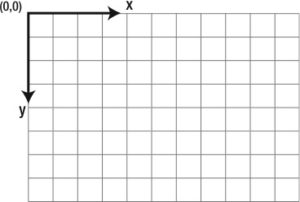
Generating images
1. Create a blank canvas
2. Draw images or write on this canvas using different functions
3. Save image to disk or load into browser
4. clear the image from memory
Generating a new image
$image = imagecreate(200, 150);
The code above creates a blank image whose width would be 200px and height would be 150px. This function will return an image resource identifier or false in case of errors.
Allocate color to images
int imagecolorallocate ( resource $image , int $red , int $green , int $blue )
The function takes an image resource and RGB color values for red, green and blue it returns a color identifier that represents a color composed of RGB colors. RGB colors range is from 0-255.
$red    = imagecolorallocate($image, 255, 0, 0);

$white  = imagecolorallocate($image, 255, 255, 255);

$black  = imagecolorallocate($image, 0, 0, 0);
Color code can be specified in Hexadecimal as well.
$white = imagecolorallocate($image, 0xFF, 0xFF, 0xFF);

$black = imagecolorallocate($image, 0x00, 0x00, 0x00);
Basics of drawing with GD library in PHP
How to draw a pixel on an image.
$canvas     = imagecreate(200, 100)

$grey       = imagecolorallocate($canvas, 230, 230, 230);

$black      = imagecolorallocate($canvas, 0, 0, 0);

imagesetpixel($canvas, 120, 60, $black)

header("Content-type: image/png");

imagepng($cnavas)

imagedestroy($canvas);
We created a blank canvas using imagecreate function and storing in $canvas whose width is 200 X 100. Two colors grey and black using imagecolorallocate with parameters $canvas and Red, Green, Blue color values. imagesetpixel method accepts 4 parameters, first argument is $canvas variable, then x, y co-ordinates and last argument is color.
A pixel is created on canvas on 120px from x-axis of left side and 60px from y-axis. Next is the header function that sends image contents to the browser as a PNG image. In order to save this image on hard disk, we can pass image path as an optional argument.
imagepng('/images/pixel.png');
The code above will save the image to images folder with the name pixel.png. We can create PNG, JPG, GIF images using GD library functions. Other functions are imagejpeg(), imagegif(). Finally we clear image from memory using imagedestroy() function
How to draw line using GD library in php
bool imageline ( resource $image , int $x1 , int $y1 , int $x2 , int $y2 , int $color )
//Create a 200 x 200 image
$canvas = imagecreatetruecolor(200, 200);

//Allocate color
$green = imagecolorallocate($canvas, 132, 135, 28);

//Draw line each with its own color
imageline($canvas, 60, 60, 120, 120, $green);

//Output image and free from memory
header('Content-Type: image/jpeg');

imagejpeg($canvas);

imagedestroy($canvas);
How to create a rectangle using GD library in PHP
bool imagerectangle ( resource $image , int $x1 , int $y1 , int $x2 , int $y2 , int $color )
Consider the code below.
// Create a 200 x 200 image
$canvas = imagecreatetruecolor(200, 200);

// Allocate color
$white = imagecolorallocate($canvas, 255, 255, 255);

// Draw rectangle each with its color
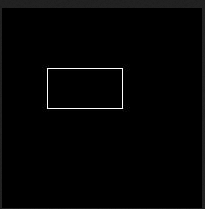
imagerectangle($canvas, 45, 60, 120, 100, $white);

// Output and free from memory

header('Content-Type: image/jpeg');

imagejpeg($canvas);

imagedestroy($canvas);
How to create a circle and ellipses using GD library in PHP
bool imageellipse ( resource $image , int $cx , int $cy , int $width , int $height , int $color )
//Create a blank image.
$image = imagecreatetruecolor(400, 300);

//Choose a color for the ellipse.

$color = imagecolorallocate($image, 255, 255, 255);

//Draw the ellipse.

imageellipse($image, 200, 150, 300, 200, $color);

//Output the image.

header("Content-type: image/png");

imagepng($image);
Create Circle using GD library in php
In order to create a complete Circle we need to specify the same height and width like
 // Draw the circle.
imageellipse($image, 200, 150, 200, 200, $color);
Code to draw a complete circle.
// Create a blank image.

$image = imagecreatetruecolor(400, 300);


// Choose a color for the ellipse.

$color = imagecolorallocate($image, 255, 255, 255);


// Draw the ellipse.

imageellipse($image, 200, 150, 200, 200, $color);


// Output the image.

header("Content-type: image/png");
imagepng($image);

How to draw an arc using GD Library in PHP
Syntax:
bool imagearc (resource $image, int $cx,int $cy, int $width, int $height, int $start,int $end,int $color )
2. $cy is y-co-ordinate of center $width is width of arc
3. $height is height of arc $start arc’s start angle
4. $end is arc’s end angle
5. $color is color identifier created with imagecolorallocate
// create a 1500*150 image
$image     = imagecreatetruecolor(200, 200);

// allocate some colors
$white   = imagecolorallocate($image, 255, 255, 255);

$red     = imagecolorallocate($image, 255,   0,   0);

$green   = imagecolorallocate($image,   0, 255,   0);

$blue    = imagecolorallocate($image,   0,   0, 255);

// draw the head
imagearc($image, 100, 100, 200, 200,  0, 360, $white);

// draw mouth
imagearc($image, 100, 100, 150, 150, 25, 155, $red);

// left and then the right eye
imagearc($image,  60,  75,  50,  50,  0, 360, $green);

imagearc($image, 140,  75,  50,  50,  0, 360, $blue);

// output image in the browser
header("Content-type: image/png");

imagepng($image);

// free memory
imagedestroy($image);
How to create polygons using PHP GD library
bool imagepolygon ( resource $image , array $points , int $num_points , int $color )
// Create a blank image
$image = imagecreatetruecolor(400, 300);

// Allocate a color for the polygon
$color = imagecolorallocate($image, 255, 255, 255);

// Draw the polygon
imagepolygon($image, array(
        0,   0,
        100, 200,
        300, 200
    ),
    3,
    $color);

// Output the picture to the browser
header('Content-type: image/png');

imagepng($image);

imagedestroy($image);

In order to do this you have to create an image resource using imagecreatetruecolor, then allocated black color to $color using imagecolorallocate function. In addition inimagepolygon parameters passed are $image as image resource and an array of vertices.
The first vertex is x, y as 0, 0 second vertex is 100, 200 and third vertex is 300, 200, then we specify the number of vertices. The last argument is $color. This creates a polygon as shown above.
How to create a thumbnail using GD library in PHP
Generate Thumbnail using GD library in PHP
 $image 		    = imagecreatefromjpeg('flower.jpeg');

 $width 		    = imagesx($image);

 $height 	 	    = imagesy($image);

 $thumb_height              = intval($height / 3);

 $thumb_width               = intval($width / 3);

 $thumbnail 	            = imagecreatetruecolor($thumb_width, $thumb_height);

 imagecopyresampled($thumbnail, $image, 0,0,0,0, $thumb_width, $thumb_height, $width, $height);

 header('content-type: image/jpeg');

 imagejpeg($thumbnail);

 imagedestroy($thumbnail);

 imagedestroy($image);
Original Image:


Summary
Related Articles:
Previous Article:
 Best Tech Blog For Programming Articles And Video Tutorials Code Is Easy


