How to create a WordPress plugin
Creating a WordPress plugin can be a rewarding experience, as it allows you to extend the functionality of a website and improve the user experience. Whether you’re a beginner or an experienced programmer, you can create a WordPress plugin relatively easily with some basic knowledge of PHP, HTML, and CSS
In this tutorial, we’ll walk you through the steps of creating a simple WordPress plugin. By the end of this tutorial, you’ll have a good understanding of how plugins work and the skills to create your own custom plugins.
Hooks and Filters
In WordPress, hooks and filters are two of the most important concepts to create a WordPress plugin.
Hooks
Hooks are a way to allow plugins to “hook into” the WordPress core and add custom functionality. There are two types of hooks: actions and filters.
Actions allow plugins to run code at specific points in the WordPress core, such as when a page is loaded or when a post is saved.
Filters allow plugins to modify data before it is displayed on the front-end of a website, such as modifying the output of a post or the content of an email.
Filters
Filters are functions that modify data in WordPress. They are used to make changes to the data before it is displayed on the front-end of a website. For example, you can use filters to modify the content of a post, the title of a page, or the output of a widget.
Both hooks and filters are called using the apply_filters and do_action functions, respectively, in the WordPress core. When creating a plugin, you can add your own custom functions to these hooks and filters to add custom functionality to your WordPress site.
WordPress API
Another important concept in plugin development is the WordPress API, which provides a set of functions for accessing and manipulating data in WordPress. The WordPress API includes functions for accessing posts, pages, comments, categories, and more. By using the WordPress API, you can create plugins that interact with the WordPress database and provide custom functionality to your WordPress site.
Difference between a plugin and a theme
Finally, it’s important to understand the difference between a plugin and a theme in WordPress. A theme controls the appearance of a WordPress site, while a plugin adds custom functionality to a site. When developing a plugin, it’s important to focus on the functionality and not the appearance of the site, as themes can be changed without affecting the functionality of the site.
Important Terms in WordPress
Here are a few more terms that a WordPress plugin developer should be familiar with:
- WordPress Codex: The WordPress Codex is the official documentation for WordPress and is a comprehensive resource for plugin developers. It contains information on how to use the WordPress API, how to create custom plugins, and how to troubleshoot common issues.
- WordPress Security: WordPress security is an important concern for plugin developers. It is important to follow best practices for securing your plugin, such as validating user input, escaping output, and following the WordPress security guidelines.
- WordPress Actions and Filters: Actions and filters are the two main types of hooks in WordPress. Actions allow you to run code at specific points in the WordPress core, while filters allow you to modify data before it is displayed on the front-end of a website.
- WordPress Widgets: Widgets are small blocks of content that can be added to a sidebar or other widgetized area on a WordPress site. Plugin developers can create custom widgets to add additional functionality to a WordPress site.
- WordPress Shortcodes: Shortcodes are a way to embed custom content into a WordPress post or page using a shortcode tag. Plugin developers can create custom shortcodes to add custom content or functionality to a WordPress site.
- WordPress Settings API: The WordPress Settings API is a set of functions for managing the options and settings for a plugin. It provides a way for plugin developers to create custom options pages for their plugins, allowing users to configure the plugin to their liking.
- WordPress Database: The WordPress database is where all the content, settings, and metadata for a WordPress site are stored. Plugin developers can interact with the WordPress database using the WordPress API to retrieve, add, update, and delete data.
- WordPress Plugins repository: The WordPress plugin repository is the official repository for WordPress plugins. It is where users can search for and download plugins to use on their WordPress sites.
By understanding these terms and concepts, you will be well on your way to creating successful and secure WordPress plugins.
Step 1: Choose a Plugin Idea
The first step in creating a WordPress plugin is to choose what you want your plugin to do. It could be anything from adding a custom widget to the site to creating a custom contact form. The possibilities are endless, so choose something that is both challenging and interesting to you. For the purpose of this tutorial, we’ll create a plugin that displays a custom message to the visitors of the site.
Step 2: Create a Plugin Folder
Once you’ve decided what your plugin will do, it’s time to create a folder for your plugin. The folder name should be unique and descriptive, using only lowercase letters and hyphens. For this tutorial, we’ll create a folder named “my-first-plugin“.
Step 3: Create a Plugin File
Next, create a new file inside the plugin folder with a .php extension. The file name should match the folder name, with the .php extension added. For example, the file name for our plugin folder will be “my-first-plugin.php“.
Step 4: Write the Plugin Header
The first thing you need to do in your plugin file is to add a plugin header, which is a block of code that provides information about the plugin to WordPress. The plugin header is a comment block that starts with /* and ends with */. The plugin header should include the following information:
- Plugin Name: The name of your plugin
- Plugin URI: The URL where the plugin can be found
- Description: A brief description of what the plugin does
- Version: The version number of the plugin
- Author: The name of the author of the plugin
- Author URI: The URL of the author’s website
- License: The license under which the plugin is released
- Text Domain: The domain used for localization purposes
Here’s an example of a plugin header for our “My First Plugin”
<?php
/*
Plugin Name: My First Plugin
Plugin URI: https://www.example.com/my-first-plugin
Description: This plugin displays a custom message to visitors of the site.
Version: 1.0
Author: John Doe
Author URI: https://www.example.com
License: GPLv2 or later
Text Domain: my-first-plugin
*/
Step 5: Write the Plugin Function
The next step is to write the plugin function that will display the custom message. In this example, we’ll create a function called “display_message” that will display a message to the visitors of the site. To create a function, simply add the following code to your plugin file:
function display_message() {
    echo "Welcome to our website!";
}
Step 6: Hook the Function to WordPress
The next step is to hook the function to WordPress so that it can be executed. WordPress has a number of actions and filters that you can use to hook your functions. For this example, we’ll use the “wp_footer” action, which is called before the closing </body> tag of the page. To hook the function, add the following code to your plugin file:
add_action('wp_footer', 'display_message');
Step 7: Test the Plugin
The final step is to test the plugin. To do this, you need to upload the plugin folder to your WordPress site. The folder should be uploaded to the wp-content/plugins directory. Once the folder has been uploaded, go to the WordPress admin area and activate the plugin.
To test the plugin, simply visit a page on your WordPress site. You should see the custom message displayed at the bottom of the page.


Step 8: Customize the Plugin
Now that the plugin is working, you can customize it to meet your needs. For example, you can add options to the plugin to allow the site owner to control the message that is displayed. To do this, you’ll need to use the WordPress settings API, which is a set of functions that allow you to create options pages for your plugins.
Step 9: Submit the Plugin to the WordPress Plugin Repository
If you want to share your plugin with the WordPress community, you can submit it to the WordPress plugin repository. To do this, you’ll need to create a readme file that describes the plugin, as well as a banner and icon that will be used in the repository. You’ll also need to follow the guidelines for submitting plugins to the repository.
Conclusion
In conclusion, creating a WordPress plugin can be a fun and rewarding experience. By following the steps outlined in this tutorial, you’ll have a good understanding of how plugins work and the skills to create your own custom plugins. Good luck, and have fun!
Advance example to create a Contact Us form WordPress plugin
let’s create an advanced plugin that allows you to add a contact form to your WordPress site. This form will allow users to send you messages through your site, and you’ll receive an email with the message.
Step 1: Create the Plugin Folder
Create a new folder in the wp-content/plugins directory and name it wp-contact-form. This folder will contain all the files for your plugin.
Step 2: Create the Main Plugin File
Create a new file in the plugin folder and name it wp-contact-form.php. This will be the main plugin file, and it will contain the code for your plugin.
Step 3: Define the Plugin Header
Add the following code to the top of the plugin file:
<?php
/*
Plugin Name: WP Contact Form
Plugin URI: http://example.com/wp-contact-form
Description: A simple contact form for your WordPress site
Version: 1.0
Author: Your Name
Author URI: http://example.com
*/
This code defines the plugin header, which is used by WordPress to display information about the plugin in the WordPress admin area.
Step 4: Create the Contact Form
Add the following code to the plugin file:
function display_contact_form() {
  $email = get_option('admin_email');
  $content = '
  <form action="' . esc_url( $_SERVER['REQUEST_URI'] ) . '" method="post">
  <p><label for="name">Name: <br /><input type="text" name="name" id="name"></label></p>
  <p><label for="email">Email: <br /><input type="email" name="email" id="email"></label></p>
  <p><label for="message">Message: <br /><textarea rows="10" cols="35" name="message" id="message"></textarea></p>
  <p><input type="submit" name="submit" value="Send"></p>
  </form>
  ';
  return $content;
}
This function creates a simple contact form with fields for name, email, and message. The form is submitted using the POST method, and the form data is sent to the same page as the form.
Step 5: Process the Form Data
Add the following code to the plugin file:
function process_contact_form() {
  if ( isset( $_POST['submit'] ) ) {
    $name = sanitize_text_field( $_POST['name'] );
    $email = sanitize_email( $_POST['email'] );
    $message = esc_textarea( $_POST['message'] );
    $to = get_option( 'admin_email' );
    $subject = 'Contact Form Submission';
    $headers = "From: $name <$email>" . "\r\n";
    wp_mail( $to, $subject, $message, $headers );
    $content = '<p>Thank you for your message!</p>';
    return $content;
  }
}
This function processes the form data when the form is submitted. The form data is sanitized to remove any harmful code, and then sent to the WordPress administrator email using the wp_mail function.
Step 6: Add the Form to Your Site
Add the following code to the plugin file:
function add_contact_form_to_content($content) {
  if ( is_single() ) {
    $content .= display_contact_form();
    $content .= process_contact_form();
  }
  return $content;
}
add_filter( 'the_content', 'add_contact_form_to_content' );
This function adds the contact form to the content of your single posts. You can change the is_single() function to any other conditional tag to display the form on other pages.
Step 7: Add CSS to Style the Form
Create a new file in the plugin folder and name it wp-contact-form.css. This file will contain the CSS for your plugin.
Add the following CSS to the file:
form {
  background-color: #f2f2f2;
  padding: 20px;
  border-radius: 5px;
  margin-top: 20px;
}

label {
  font-weight: bold;
  margin-top: 10px;
  display: block;
}

input[type="text"],
input[type="email"],
textarea {
  width: 100%;
  padding: 10px;
  margin-top: 8px;
  border-radius: 5px;
  border: 1px solid #ccc;
}

input[type="submit"] {
  width: 100%;
  background-color: #4CAF50;
  color: white;
  padding: 14px 20px;
  margin-top: 10px;
  border: none;
  border-radius: 4px;
  cursor: pointer;
}

input[type="submit"]:hover {
  background-color: #3e8e41;
}
This CSS styles the form with a light gray background, rounded corners, and a green submit button.
Step 8: Load the CSS in the Plugin
Add the following code to the plugin file:
function load_contact_form_css() {
  wp_enqueue_style( 'wp-contact-form', plugin_dir_url( __FILE__ ) . 'wp-contact-form.css' );
}
add_action( 'wp_enqueue_scripts', 'load_contact_form_css' );
This code loads the CSS file in your plugin. The CSS file will be loaded on all pages of your site.
That’s it! Your plugin is now complete, and you can use it to add a contact form to your WordPress site. To activate the plugin, log in to your WordPress admin area and go to the “Plugins” section. Find your plugin in the list and click the “Activate” link.
Note: This is just a basic example of how to create a WordPress plugin. You can modify the code to fit your specific needs and add additional features to your plugin
<?php
/*
Plugin Name: Contact Form
Plugin URI:
Description: A simple contact form plugin
Version: 1.0
Author: OpenAI
Author URI:
*/

function display_contact_form() {
  $form = '<form action="" method="post">';
  $form .= '<label for="name">Name:</label>';
  $form .= '<input type="text" id="name" name="name" required><br>';
  $form .= '<label for="email">Email:</label>';
  $form .= '<input type="email" id="email" name="email" required><br>';
  $form .= '<label for="message">Message:</label>';
  $form .= '<textarea id="message" name="message" required></textarea><br>';
  $form .= '<input type="submit" name="submit" value="Submit">';
  $form .= '</form>';

  return $form;
}

function process_contact_form() {
  if ( isset( $_POST['submit'] ) ) {
    $to = get_option( 'admin_email' );
    $subject = 'Contact Form Submission';
    $body = 'Name: ' . $_POST['name'] . "\n\n";
    $body .= 'Email: ' . $_POST['email'] . "\n\n";
    $body .= 'Message: ' . $_POST['message'];
    $headers = array( 'Content-Type: text/html; charset=UTF-8' );

    wp_mail( $to, $subject, $body, $headers );
  }
}

function add_contact_form_to_content($content) {
  if ( is_single() ) {
    $content .= display_contact_form();
    $content .= process_contact_form();
  }
  return $content;
}
add_filter( 'the_content', 'add_contact_form_to_content' );

function load_contact_form_css() {
  wp_enqueue_style( 'wp-contact-form', plugin_dir_url( __FILE__ ) . 'wp-contact-form.css' );
}
add_action( 'wp_enqueue_scripts', 'load_contact_form_css' );
And the CSS for styling the form:
form {
  background-color: #f2f2f2;
  padding: 20px;
  border-radius: 5px;
  margin-top: 20px;
}

label {
  font-weight: bold;
  margin-top: 10px;
  display: block;
}

input[type="text"],
input[type="email"],
textarea {
  width: 100%;
  padding: 10px;
  margin-top: 8px;
  border-radius: 5px;
  border: 1px solid #ccc;
}

input[type="submit"] {
  width: 100%;
  background-color: #4CAF50;
  color: white;

Test and Run the plugin
To test and run this plugin on a WordPress website, you will need to follow these steps:
- Create a new folder in the
wp-content/pluginsdirectory with the namecontact-form. - Create a new PHP file inside the folder with the name
contact-form.phpand paste the plugin code into it. - Create a new CSS file inside the folder with the name
wp-contact-form.cssand paste the CSS code into it. - Log in to your WordPress dashboard and navigate to the
Pluginssection. - Find the
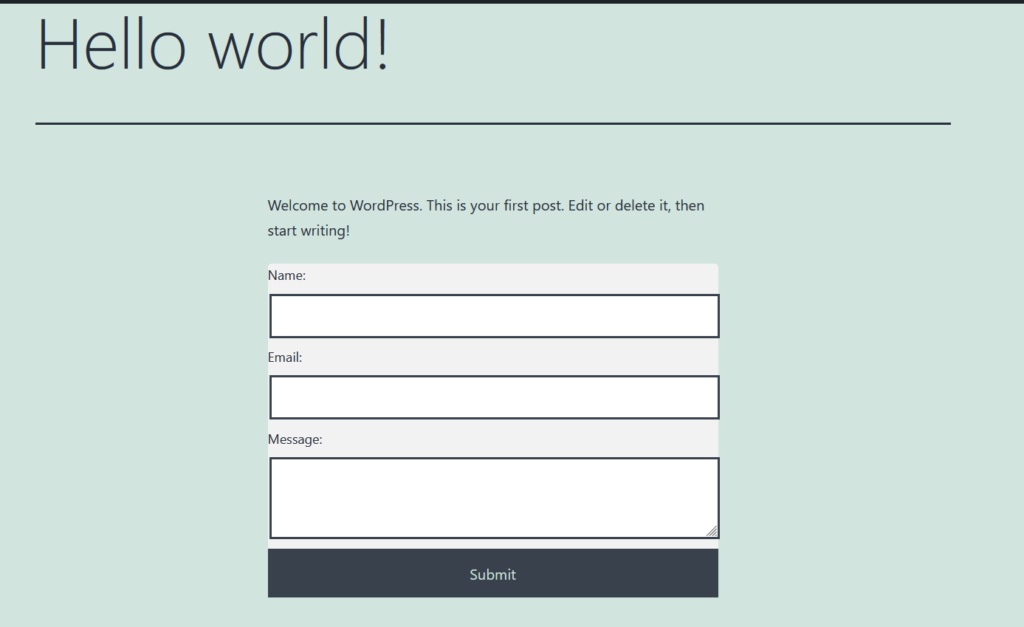
Contact Formplugin in the list and click on theActivatebutton. - Once the plugin is activated, you can view the contact form on a single post or page by viewing it on the front-end of your website.
- To test the form, fill out the form fields and click the
Submitbutton. You should receive an email with the form data at the email address associated with your WordPress administrator account. - If you want to make changes to the form or the functionality of the plugin, you can edit the
contact-form.phpandwp-contact-form.cssfiles in thewp-content/plugins/contact-formdirectory and then refresh the page on your website to see the changes.
Source Code for the tutorial
You can find the source code of the tutorial at: GitHub Plugin Repository
Summary
Becoming a plugin developer for WordPress requires a good understanding of PHP and WordPress development. You can start by learning the basics of PHP programming and familiarizing yourself with the WordPress development environment, including the WordPress Codex and API. You should also familiarize yourself with common WordPress functions and action/filter hooks. Practicing by creating simple plugins and customizing existing ones can help you develop your skills and build a portfolio. Consider contributing to open-source projects, attending WordPress meetups, and participating in online forums to continue learning and networking with the WordPress community. With dedication and hard work, you can become a successful plugin developer for WordPress.
That’s it! You now have a functioning contact form plugin on your WordPress website.
Learning WordPress Plugin Development
Creating WordPress Plugins The Right Way
