Import CSV file using nodejs and MongoDB
CSV or comma separated files are often used to export or import data in web applications. Generating CSV using Nodejs and MongoDB was explored in a previous article. In this tutorial, you learn, how to import CSV file using NodeJS into MongoDB.
In order to import CSV file using Nodejs and MongoDB, following tasks are performed.
1. Create a MongoDB database
2. Generate an application, to import CSV file using NodeJS
3. Install Mongoose module to connect and process data using mongoose application.
4. Install Fast-CSV module to import CSV file using nodejs into MongoDB collection
5. Install flash-connect module to display a success flash message
6. Ajax GET request to fetch and display data using Nodejs and MongoDB
Install MongoDB and create a database to import CSV file using nodejs
To import CSV file using nodejs into a MongoDB collection, you need to install MongoDB. Visit MongoDB download Center, download and install it on your system. On a Windows system, you can download the installer. After installation, go to installation directory on the command line.
cd C:\Program Files\MongoDB\Server\3.6\bin
Type command mongod. MongoDB server starts. Now open another command line and go to the same path, type mongo, a mongo shell starts. Create a database, using use [database name] command.
use dbproducts
The database will be changed to dbproducts. Now, create a nodejs application and connect to MongoDB database. After creating an application to import a CSV file using nodejs.
Generate a NodeJS application to import CSV file using nodejs
First, install NodeJS on your system. Visit nodejs website. Download and install. Then install express generator and Express command line to generate a NodeJS, Express application. NPM or Node Package Manager is also installed. Using NPM different Node packages and modules can be installed.
To install express generator, type the command below on the command line. Express generator can be used to get an express application skeleton.
npm install express-generator -g
Let us generate a NodeJS, Express application.
express --view=pug import-csv-nodejs
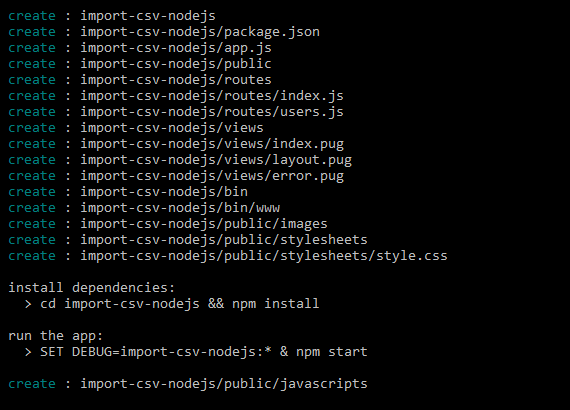
Type the command to install necessary packages and modules.
cd import-csv-nodejs && npm install
To view the running application.
SET DEBUG=import-csv-nodejs:* & npm start
Install Mongoose package
In order to connect to MongoDB, install Mongoose package.
npm install --save mongoose
Install fast-csv module to import CSV file using nodejs
To import and parse a CSV file using nodejs, you need to install the fast-csv package.
npm install fast-csv
Install connect-flash and express session module
To show users, information or error messages, connect flash and express session modules are required.
npm install connect-flash;

pm install express-session;
Create a sample CSV file
Open the public folder and add a new directory named files. Add a file called products.csv, and add following data to it.

Create a product model for products collections
Open the project folder in your favorite IDE. Add a folder models to the root folder. Inside models folder add a file Product.js
var mongoose = require('mongoose');

var Schema = mongoose.Schema;

var productSchema = new Schema({

  name: { type: String, Required:  'Product name cannot be left blank.' },

  price:    { type: String,     Required:  'Product price cannot be left blank.'},

  category: { type: String ,    Required:  'Product category cannot be left blank'},

  description: { type: String },

  manufacturer: { type: String }

});

module.exports = mongoose.model('Products', productSchema);
First, mongoose module is included and then a schema is created for products collection. Products schema has fields product, price, category, description and manufacturer of a product as String. Finally, products schema is exported.
Connect to MongoDB using mongoose in app.js
Open app.js file. Above the index and user routes add the code below. First, include Express Session and connect-flash.
var session = require('express-session');

var flash = require('connect-flash');

var mongoose = require('mongoose');

mongoose.Promise = global.Promise;

mongoose.connect('mongodb://localhost/dbproducts', { useMongoClient: true });

require("./models/Product");
Mongoose module is included and is assigned to mongoose. After that, a promise is used and is assigned to mongoose.promise. A database connection is created to dbproducts. Next, models products schema is included so it can be used in all other routes.
After the line
var app = express();
Add the code below that sets the setting for the express session. Sets max age and secret.
app.use(session({ cookie: { maxAge: 60000 },

                  secret: 'secret',

                  resave: false,

                  saveUninitialized: false}));
Add code to index.js
Open the indx.js file in and replace the code with the code given below. Express, fast-csv modules are included. After creating the route, fs module and mongoose are included. Product model was included using mongoose.model. CSV file path is assigned to csvfile variable.
var express = require('express');

var csv = require("fast-csv");

var router = express.Router();

var fs = require('fs');

var mongoose = require('mongoose');

var Product  = mongoose.model('Products');

var csvfile = __dirname + "/../public/files/products.csv";

var stream = fs.createReadStream(csvfile);
A stream is created using createReadStream method of fs module.
Add ‘/’ GET route in index.js file
Inside index.js file adds ‘/’ route. A pug template file is rendered with title.
router.get('/', function(req, res, next) {

    res.render('index', { title: 'Import CSV file using NodeJS' });

})
Add bootstrap code to the layout.pug file
Open layout.pug file inside View folder. Replace the current code with the pug code.
doctype html

html(lang="en")

    head

        title Bootstrap Example

        meta(charset="utf-8")

        meta(name="viewport", content="width=device-width, initial-scale=1")

        link(rel="stylesheet", href="https://maxcdn.bootstrapcdn.com/bootstrap/3.3.7/css/bootstrap.min.css")

        script(src="https://ajax.googleapis.com/ajax/libs/jquery/3.2.1/jquery.min.js")

        script(src="https://maxcdn.bootstrapcdn.com/bootstrap/3.3.7/js/bootstrap.min.js")

    body
        .container

           block content

        script(src="/javascripts/app.js")
Bootstrap, CSS, jQuery and bootstrap’s JavaScript file is added. Inside body tag, a container div is added. Inside container div, a block content is added.
After content, a script app.js from JavaScript folder inside the public folder is included. app.js file is used on the client side.
Add Bootstrap code to Index.pug file
Open index.pug file inside views folder and add the code to it.
extends layout
block content
br
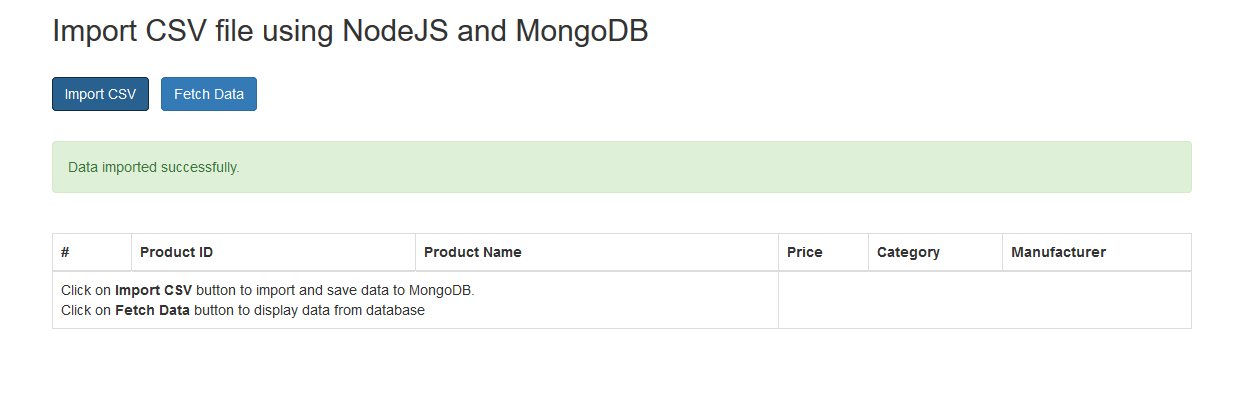
h2 Import CSV file using NodeJS and MongoDB
br
p
a(href='javascript:void(0)' class='btn btn-primary' id='importdata') Import CSV
|
a(href='javascript:void(0)' class='btn btn-primary' id='fetchdata') Fetch Data
br
p#message.alert.alert-success(style='display:none')
br
table.table.table-bordered
thead
tr
th #
th Product ID
th Product Name
th Price
th Category
th Manufacturer
tbody#trdata
tr
td(colspan='3') Click on <strong>Import CSV</strong> button to import and save data to MongoDB. <br />Click on <strong>Fetch Data</strong> button to display data from database
pug file extends layout file. A block content is added as you can see in the layout file, we have a block content. There are two buttons. Import a CSV button and Fetch Data button.
Import CSV button imports a CSV file using nodejs and save to the database. Import CSV button is assigned an id importdata and Fetch data button is assigned an id fetchdata.
An HTML table used to display product id, product name price, category and manufacturer. A tbody with id trdata is also added.

Import CSV file using NodeJS and AJAX into MongoDB collection.
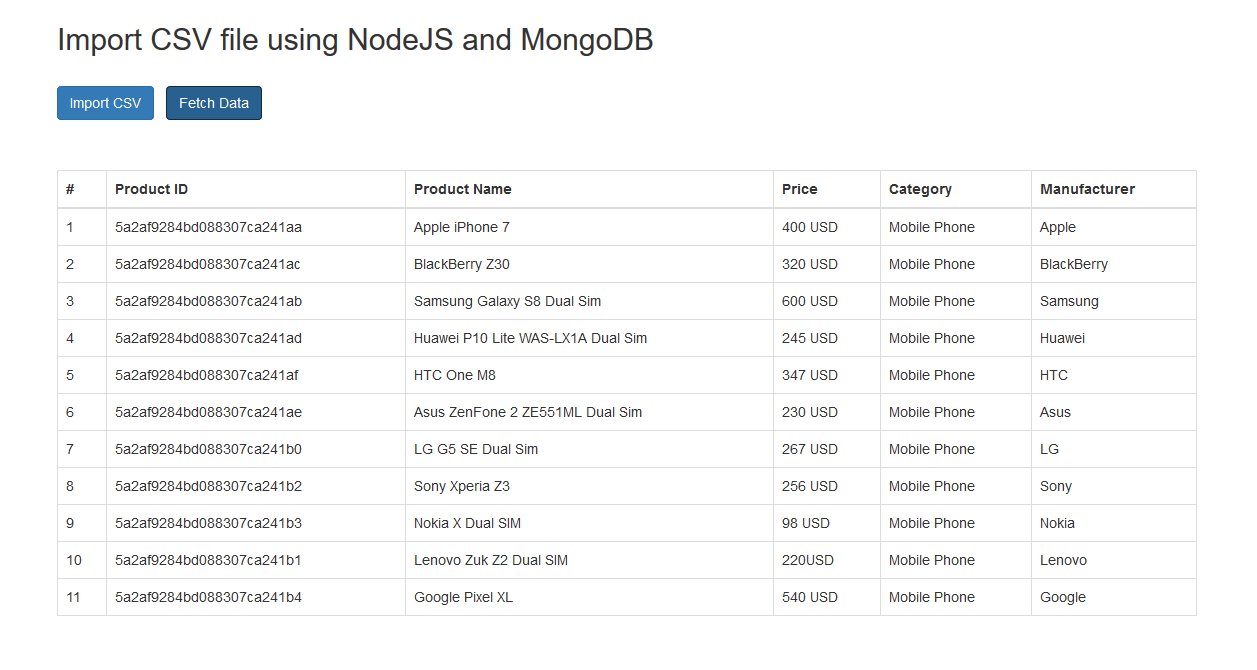
If a user clicks on Import CSV button an AJAX request is sent to the server to import a CSV file using nodejs. CSV data is imported from products CSV file and is inserted into products collection.
Create a file app.js inside JavaScripts folder inside public folder.
$(function(){

    /** Click on Fetch data and display in HTML table **/

    $("#fetchdata").on('click', function(){

        $.get( "/fetchdata", function( data ) {

            var products = data['data'];

            $("#trdata").html('');

            $("#message").hide();

            var string = '';

            $.each(products, function(index, product ) {

                string += '<tr><td>'+(index+1)+'</td><td>'+product['_id']+'</td><td>'+product['name']+'</td><td>'+product['category']+'</td><td>'+product['price']+'</td><td>'+product['manufacturer']+'</td></tr>';

            });

            $("#trdata").html(string);

        });
    });

    /** Import data after click on a button */

    $("#importdata").on('click', function(){

        $.get( "/import", function( data ) {

            $("#message").show().html(data['success']);

        });

    });

});
In app.js, there is a click function for fetchdata button. You can see #fetchdata‘s .onclick method an anonymous function is defined.
In callback function jQuery’s $.GET method is used. $.GET method is used for AJAX call with GET HTTP method. GET request is sent to /fetchdata route. Inside fetch data method, a data array parameter is received.
Data array parameter contains data inside it. Data[‘data’] is assigned to products variable. Any previous HTML inside the TR is removed and a string is initialized with an empty string.
Inside jQuery each loop products array is browsed. Index and value of array item are passed to the anonymous method. A string with table data cells is created and concatenated with the data.
Inside each loop, a serial number is assigned by adding 1 to index, a _id that is an Object Id of MongoDB collection, product name, category, price, and manufacturer are displayed. After loop data is appended to TD tbody, that was defined earlier.
Import Data into MongoDB collection using AJAX
When the user clicks on Import data button. An Ajax request is sent to the server. Inside Click method of importdata button, a GET request is sent to /import route. Inside import route, CSV file is parsed and data is inserted into MongoDB.
router.get('/', function(req, res, next) {

  ...

}).get('/import', function(req, res, next) {

    var  products  = []

var csvStream = csv()
        .on("data", function(data){

         var item = new Product({

              name: data[0],

              price: data[1],

              category: data[2],

              description: data[3],

              manufacturer:data[4]

         });

          item.save(function(error){

            console.log(item);

              if(error){

                   throw error;

              }

          });

    }).on("end", function(){
          console.log(" End of file import");
    });

    stream.pipe(csvStream);

    res.json({success : "Data imported successfully.", status : 200});

  })
After router.get(‘/’) route, a GET route ‘import’ is added. Inside a function, three parameters, req, res, and next are accepted.
A products array and CSVStream are defined, CSV method is called and on .on data event. Inside an anonymous method, data parameter is received. Data parameter contains _id, name, price, category and description values inside data[0], data[1], data[2], data[3] and data[4] respectively.
All parameters are assigned to product Schema’s new product method to _id, name, price, category and manufacturer fieldsof item object, which is then assigned to .item variable. .item‘s save method is called.
Each product model entry is saved to products collection. Product collection is created if it does not exist. In last, end method is called and the file parsing is finished.
Next, the stream’s pipe method is used to pipe csvStream. Using JSON method a success message and status are sent as JSON to the client. After data is imported to MongoDB database user sees a success message, that CSV file Data is imported successfully.
Fetch and display data on page using AJAX in FetchData route
In the index.js file, another route fetchdata is added to fetch data from the database. When the user clicks on Fetch Data button, data is fetched and sent back to the browser and is displayed to user.
var express = require('express');
var csv = require("fast-csv");
var router = express.Router();
var fs = require('fs');

var mongoose = require('mongoose');

var Product  = mongoose.model('Products');

var csvfile = __dirname + "/../public/files/products.csv";
var stream = fs.createReadStream(csvfile);


/* GET home page. */
router.get('/', function(req, res, next) {

  ....


}).get('/import', function(req, res, next) {

  ....

}).get('/fetchdata', function(req, res, next) {

    Product.find({}, function(err, docs) {

        if (!err){

            res.json({success : "Updated Successfully", status : 200, data: docs});

        } else {

            throw err;

        }

    });

});

module.exports = router;
After ‘/’ and ‘/import’ routes a new route is added in the index.js file, inside the route’s anonymous method Product Schema’s find method is is called, the {}, empty braces, represent a condition, here we are sending an empty condition so can get all the data from MongoDB products collections.
The anonymous method returns an error and docs parameter. If there is an error, it is thrown. Otherwise, a success message and documents array from the database is returned and data is displayed to the client.
Summary
To summarize, in this tutorial you have learned to import CSV file using nodejs, created a database in MongoDB and generated an express app. Installed Fast-CSV and Mongoose modules. Created a route to import and parse data from a CSV field and inserted into products collection. Data is fetched from products collection and is displayed to the user.
You can clone or download the source code of tutorial import csv using nodejs from this GitHub Repository.

Please leave your feedback and comments below. Follow us on Twitter, like our Facebook page or subscribe to our newsletter to stay updated on upcoming tutorials.
Related Articles:
- Generate CSV using NodeJS
- Generate XML files using PHP
- Generate PDF using NodeJS
- Generate RSS Feed using NodeJS
Previous Article:
Next Article: