RESTful API with sails js using MongoDB and MySQL
Sails.js is a MVC (Model-View-Controller) framework built on top of Express framework. It is used to develop RESTful APIs and modern web applications. There are other Node js frameworks, like hapi, loopback but sails js is becoming very popular now a days. In a previous tutorial we created a nodejs mongodb rest API using express framework, this tutorial explores, how to create RESTful API with sails js. 
To complete this tutorial, following tasks are performed.
- Install Node js & NPM
- Install MongoDB
- Install sails js
- Create a sails js project
- Sails js directory structure
- Create blueprint RESTful routes
- Create shortcut routes
- Create Sails js and MySQL based RESTful API
- Create Sails js and MongoDB based RESTful API
Installing Node js & NPM
To install Node js on your machine, visit Node js download page and read this Node js mongodb tutorial.
Features of sails js framework
- Sails js is a light weight framework that is built on top of express js
- JavaScript is used to develop apps in sails js
- With sails js waterline ORM, apps can be connected to any database like MySQL, MongoDB, PostgreSQL, Redis or local disk
- Rapid prototyping APIs, that lets search, paginate, sort, filter, create, destroy, update, and create associations
- Built in web socket integration with out any additional code
- Sails can be used with any modern front-end framework
Install sails js using NPM
Open command line and go to project directory, type the command to install sails js globally.
npm install sails -g
To check sails js version.
sails -v
Create a sails js application
To create a sails js project, type the command given below. The project is named as BookStoreAPI
sails new BookStoreAPI --no-frontend
This command generates a new sails js application, note the –no-friontend flag.

Open the project folder BookStoreAPI inside the editor.
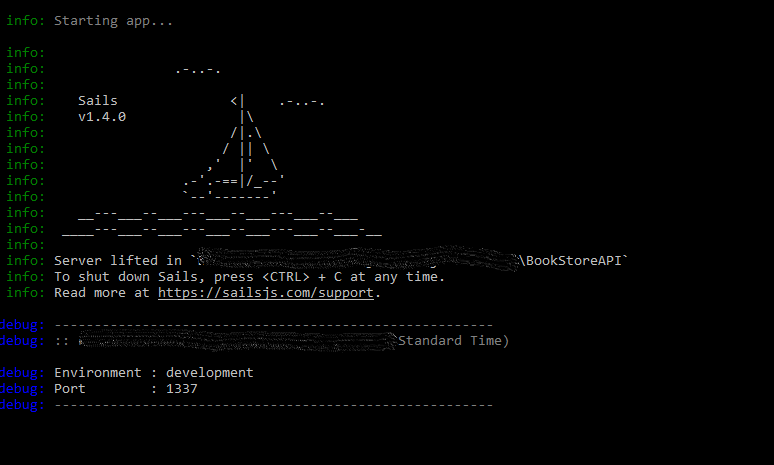
Running the sails js application
To run the application, go to the project directory on command line, type command
sails lift
This command will start the application on localhost, port 1337.
Directory structure of sails js application
The folder structure looks like the image below.

- controller‘s directory for the application controllers.
- models‘s directory for application’s models.
- helpers and policies to save middleware.
- config folder for saving configurations.
- .env directory contains development and production related configuration.
- production.js contains production ready settings with data sources.
- blueprint.js is used for creating APIs quickly.
- bootstrap.js this is entry point of sails js application.
- custom.js is used to save and define settings like API secrets etc.
- datastores.js is used to store all the database related information. MySQL, MongoDB or other databases can be used.
- global.js is used to provide global variables like loadash, async etc.
- i18n.js store internalization settings.
- local.js is used to store local development settings.
- log.js is used to produce logging information, all errors can be logged . There are 3 types of logging, info, debug and silly.
- models.js contains all the models.
- policies.js contains the policies
- routes.js is used to specify all the routes of the API
- security.js stores the CORS and other related information.
- sessions.js is used to store session related data.
- sockets.js stores built in sails js socket configuration.
- view.js is used to specify any views.
- http.js provides all the middle ware. We can add custom middle ware as well.
- app.js is entry file for the applications.
Generate a RESTful API
Sails js provides blueprint routes feature to generate RESTful routes. Lets create a book API.
sails generate api book
This command will generate a controller BookController.js and a model named book.js.
If you open blueprints.js, it will show that by default rest is true. We can do all the RESTful routes like
GET, POST, PUT, DELETE with the routes generated above.
To test these routes type command
sails lift
Following options will be prompted
1. FOR DEV: alter wipe/drop and try to re-insert ALL my data (recommended)
2. FOR TESTS: drop wipe/drop ALL my data every time I lift Sails
3. FOR STAGING: safe don’t auto-migrate my data. I will do it myself
As there is no database running for application. Choose option 1. Application starts running on localhost port 1337.
Sails js blueprint API routes
Depending on the type of application you have generated, RESTful blueprint API routes may be enabled by default, and could be used in production environment, as long you have protected routes policies to avoid any unauthorised access
To test the API we need to use Postman, it is a software to test APIs. Download and install postman. Open postman and add a new Request by clicking on + button.
Let’s create a new book.
- Select POST from HTTP methods drop down
- Add URL http://localhost:1337/book
- Select Body in the options
- Select form-data, add the book information key, values as shown in the image
- Click Send button.

The book is created successfully with ID: 1.
To see where the data is stored, go to the project folder in VS code IDE. Open .tmp directory, in .tmp directory you can see localDiskDb directory. Open book.db. Data is stored as shown below.

Get all records using GET method
- Select GET from HTTP methods drop down
- Add URL http://localhost:1337/book
- Click Send button.

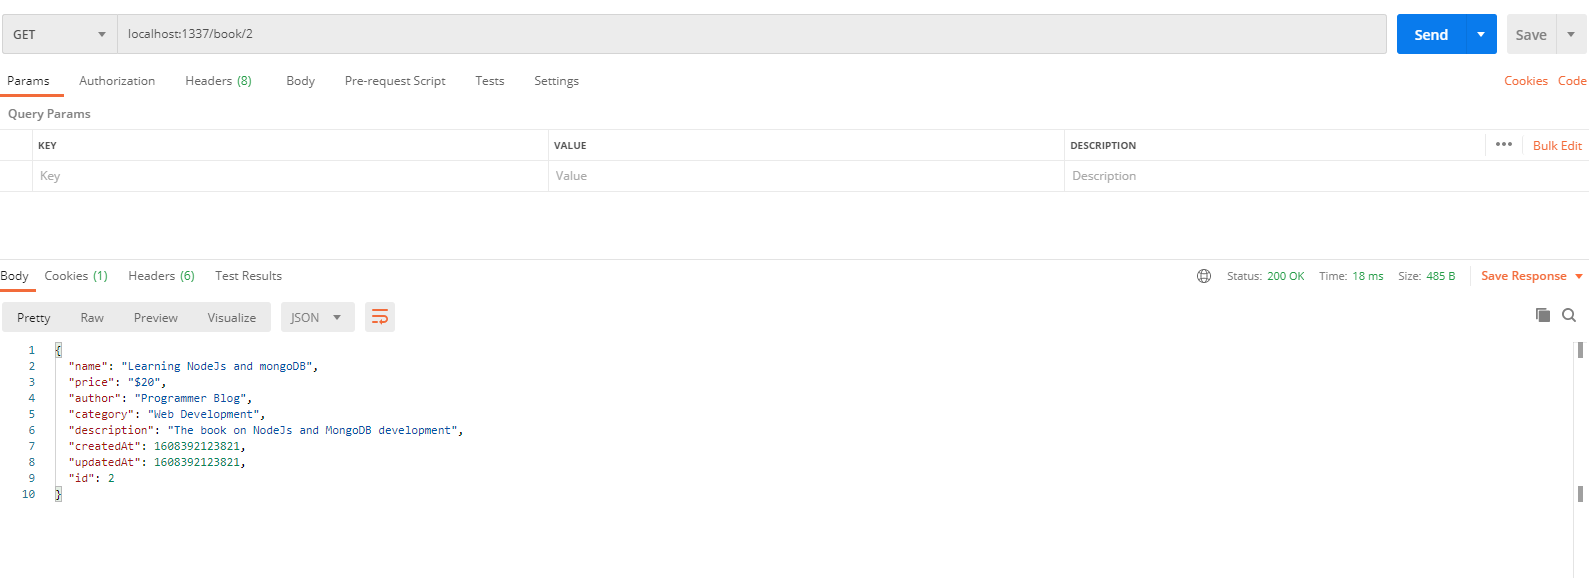
View a single book record
To fetch a single book record open a new request tab.
- Select GET from HTTP methods drop down
- Add URL http://localhost:1337/book/1 (Note the /1 after book as we need to specify the ID of the book data to be selected )
- Click Send button.
Update a book record
- Select PUT from HTTP methods drop down
- Add URL http://localhost:1337/book/1 (Note the /1 after book as we need to specify the ID of the book data to be updated)
- Change existing book information
- Click Send button.
Delete a book record
- Select DELETE from HTTP methods drop down
- Add URL http://localhost:1337/book/1 (Note the /1 after book as we need to specify the ID of the book data to be deleted)
- Click Send button.
By adding an API, sails js generates RESTful routes automatically.
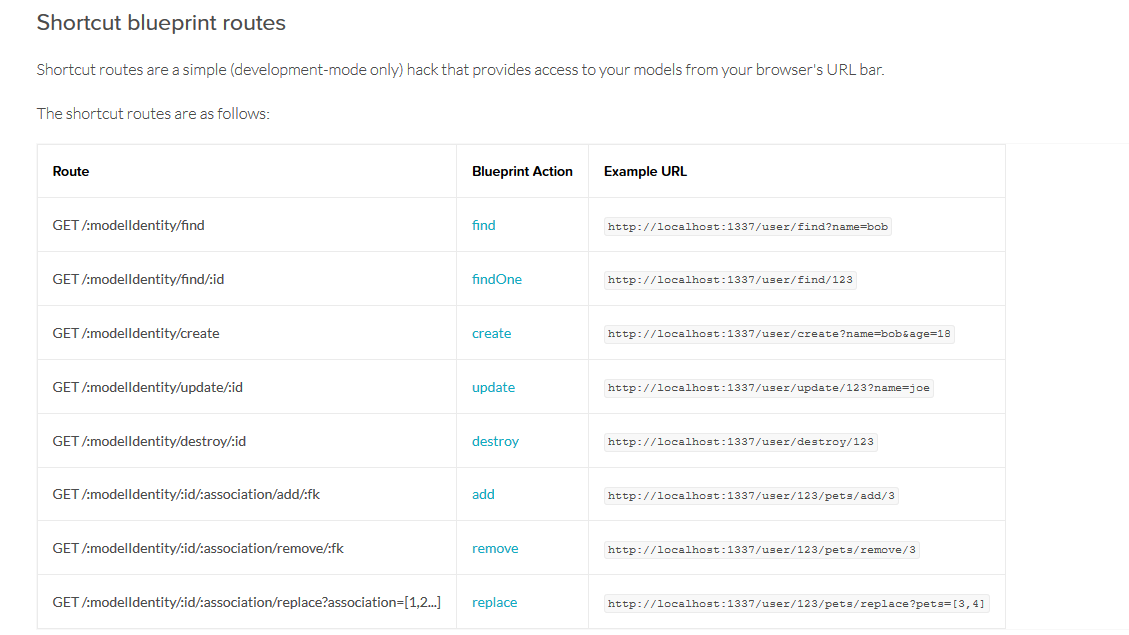
Sails js shortcut routes
Sails js provide us with shortcut routes as well. These are development mode only routes.
- To find all book records GET http://localhost:1337/book/find
- To find a single book records GET http://localhost:1337/book/find/1
- To create a book GET http://localhost:1337/book/create?name=Learn Java&price=$20
- To update a book data GET http:// localhost:1337/book/1?name=Learning Sails Js APi development&price=$20
- To delete a book : GET localhost:1337/book/destroy/1
Using sails js with MySQL
To use MySQL database with Sails js, download and install MySQL from MySQL Downloads Page.
MySQL GUI to install
To create, view and delete databases you can use MySQL Workbench or phpmyadmin. For windows visit https://dev.mysql.com/downloads/workbench/, and on a Mac, use Sequel Pro https://sequelpro.com/download or use WAMP or XAMPP, that installs MySQL with phpmyadmin.
Connect to MySQL using Sails js
- Start MySQL and open phpmyadmin or MySQL workbench and create a database db_books
- Open datastores.js file in and add code.
-
adapter: 'sails-mysql',
user: 'root',
password: '',
port: '3306',
host: 'localhost',
database: 'db_books'
The adapter is sails-mysql, user is root and password is set to blank, port used is 3306, change this information according to your system settings.
- Install sails-mysql package using NPM. Open terminal and run the command
npm i -s sails-mysql - After the package is installed. Open Book.js file in models directory and add code under attributes object. These are the properties of the book model.
-
name: { type: 'string', required: true, }, price: { type: 'string', required: true, }, category: { type: 'string', required: true, }, author: { type: 'string', }, description: { type: 'string', }, - Open the terminal, stop the project if it is already running and type sails lift
- For development environment, choose option 1
- After application is running, go to phpmyadmin, Go to the db_books database, you can see a table book is created with the columns, specified above.
Create a book using sails js & MySQL
Open postman and create a new book record. Use the steps described in above add method.
A book record is added. Go back to MySQL database and open the table, you can view the new book data.

To view a single book record
- Open the Postman
- Select GET from HTTP methods drop down
- Add URL http://localhost:1337/book/1
- Click Send button.
To Update, Delete or View all books records, repeat the steps, described before.
Using sails js RESTful API with MongoDB
Installing mongodb
To install mongodb on your system go to the https://www.mongodb.com/download-center#community and download.
Running MongoDB
To run the mongodb, refer to a Nodejs mongodb tutorial.
Create a db/data directory
Create a directory db inside data directory in C:\ drive.
Run ./mongod and ./mongo commands on command line
If you have installed MongoDB in Windows C:\mongodb, open C:\MongoDB\Server\3.4\bin and run the command ./mongod
If you have not set the system path the run mongod –dbpath /path/to/data/directory.
Open second terminal and go to application directory C:\MongoDB\Server\3.4\bin> and type ./mongo. MongoDB will be running on mongo shell.
Create a MongoDB database
To create a database on command line type: use db_books. Click enter button and database will be created. A message is displayed: switched to db db_books
Connect to MongoDB using sails js
- Open datastores.js file and remove or comment out any previous MySQL connection code.
- Add code given below
-
adapter: 'sails-mongo',
port: '27017',
host: 'localhost',
database: 'db_books'
If you have a username and password for MongoDB server, provide that as well.
- Install sails-mongo package using command.
npm i -s sails-mongo - Type command sails lift
Testing RESTful API with sails js using MongoDB
Open postman.
- Create a new request tab in Postman
- Select POST from HTTP methods drop down
- Add URL http://localhost:1337/book
- Select Body from the below options
- Select Raw and add the JSON data given below.
- Click Send button.
-
{
  "name": "Learning Sails js API development",
  "price": "$15",
  "category": "Web Development",
  "author": "Programmer Blog",
  "description": "The book on sails js API development"
}
A book record will be created.
 Go to MongoDB command line shell.
 - Type command: db.books.find.pretty().
 Go to MongoDB command line shell.
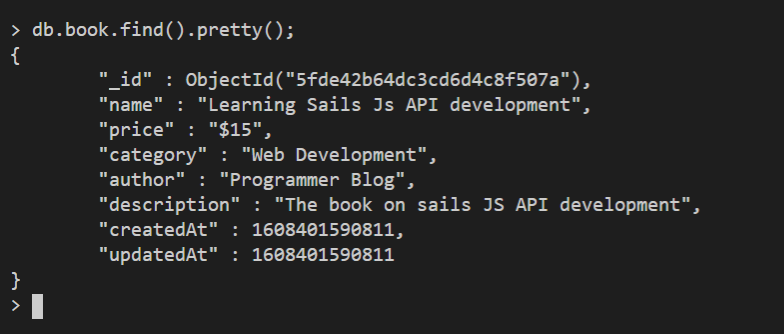
Update a record in RESTful API using sails js
To update the record of existing book
- Open postman. Create a new request tab in Postman
- Select PUT from HTTP methods drop down
- Add URL http://localhost:1337/book/5fde42b64dc3cd6d4c8f507a
- Select Body from the below options
- Select Raw and add the updated JSON data.
- Click Send button.

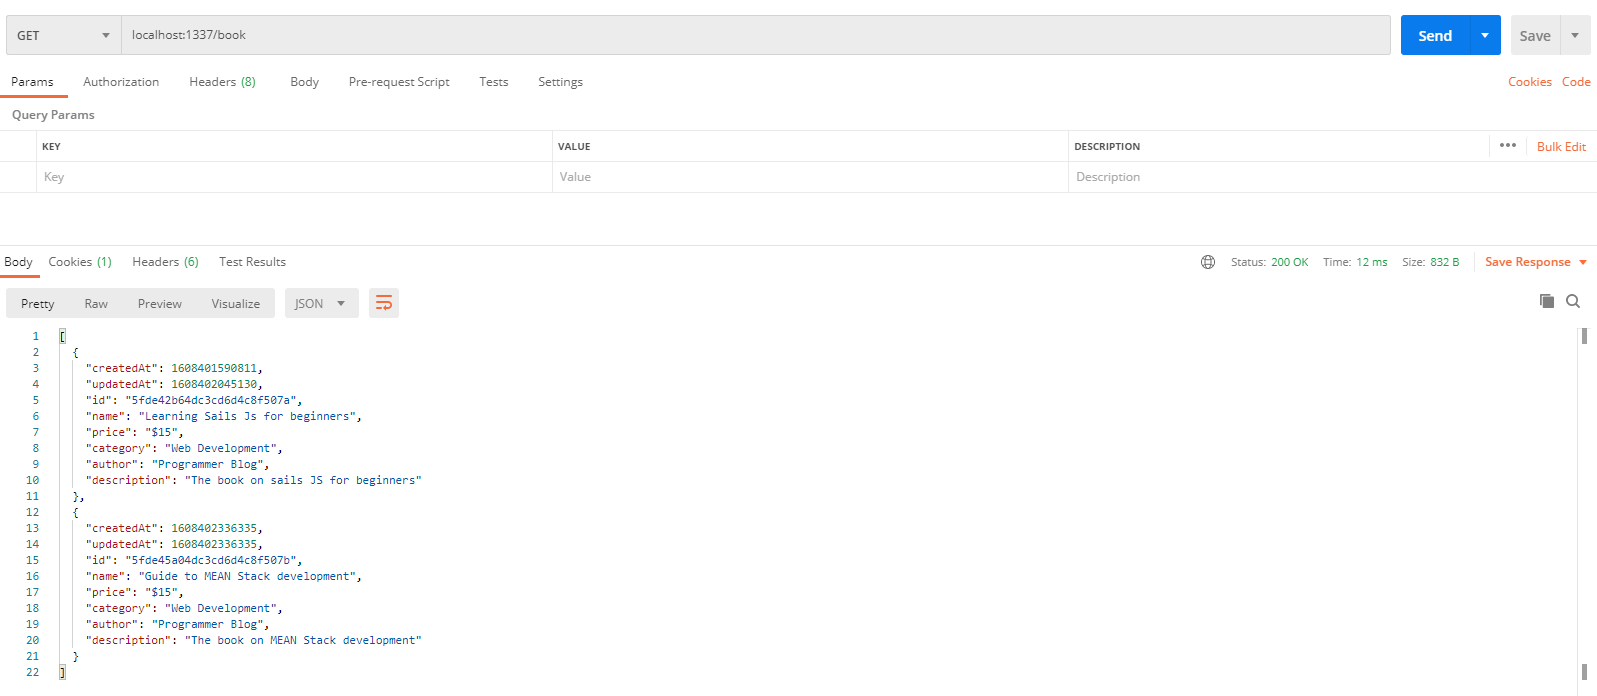
To view all book records
To view all records using RESTful API with sails js
- Create a new request tab in Postman
- Select GET from HTTP methods drop down
- Add URL http://localhost:1337/book
- Click Send button.
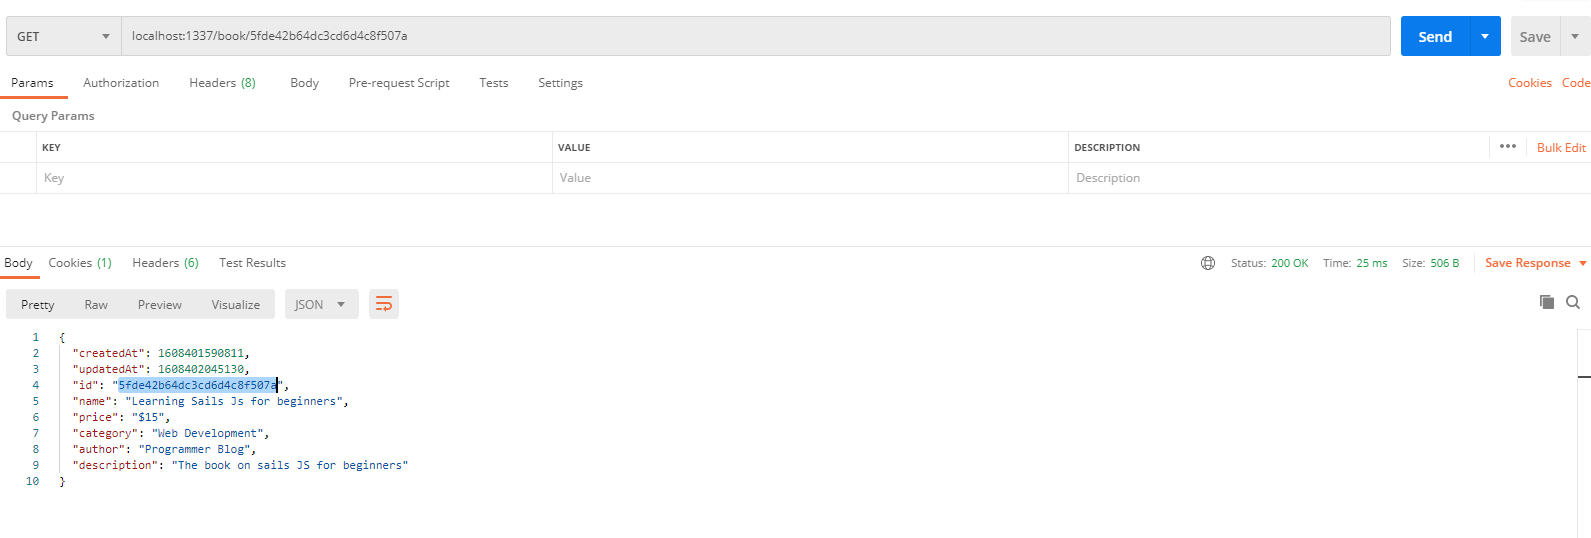
To view a single book record
- Create a new request tab in Postman
- Select GET from HTTP methods drop down
- Add URL http://localhost:1337/book/5fde42b64dc3cd6d4c8f507a
- Click Send button.
To delete a book record
- Create a new request tab in Postman
- Select DELETE from HTTP methods drop down
- Add URL http://localhost:1337/book/5fde42b64dc3cd6d4c8f507a
- Click Send button.

Summary
In this tutorial we explored Sails js, created a book API and shortcut routes, worked with MySQL and MongoDB. If you liked this tutorial, subscribe to our newsletter and follow us on Twitter, or like our Facebook page.
You can find the source code of the tutorial on our GitHub repository. Clone or download and follow the steps in tutorial.

Related Tutorials
- Nodejs loopback restful api with authentication tutorial
- Nodejs loopback restful api with authentication tutorial
- How to create a nodejs mongodb rest api and test with postman
- How to create RESTful web services in codeigniter
Previous Tutorial
Next tutorial