Related Articles


Using socketio with nodejs
Real time communication is an important feature in today’s web applications. Different technologies like long polling and socket.io are used for this purpose. Socket.io makes real time communication very easy and efficient. Socket.io can perform two way data communication. This tutorial gives you a detailed insight on using socketio with nodejs and creating a simple chat application.
In this application following tasks are performed for using socketio with nodejs.
2. Install socket.io module for real time communication on client and server
3. Create a pug template to let user type and send chat messages to server
4. Receive user messages and broadcast to all connected users
5. Show connected users with a notification who joined chat
6. Show status of user if a user is typing

Create a nodejs express application
First you need to install NodeJS. Download latest version of NodeJS. After NodeJS installation, install express generator tool.
Installing express generator
Open command line go to project directory. Type following command.
npm install express-generator -g
This installs express tool, that is used to generate application skeleton for nodejs and express applications.
Generating an Express, NodeJS application
On command line type following command to generate app.
express view=pug using-socketio-with-nodejs

A nodejs, express application is created. To install required modules type.
cd using-socketio-with-nodejs && npm install
This command changes directory to project folder and install all necessary modules in node_modules folder. To run this app type
SET DEBUG = using-socketio-with-nodejs:* & npm start
This command starts nodejs server on port 3000. Open browser and type URL.
http://localhost:3000
You can view running app.

Install socket.io module
Let us first install socket.io. Stop the app on command line by pressing ctrl+c.
npm inatall socket.io
Using socketio with nodejs
For using socketio with nodejs, first need to understand emit and receive events.
Emit and Receive events
Default events for socket.io are connect, message and disconnect but custom events can also be emitted or received. Server or client can emit and receive events. When server emits an event, it is emitted to all connected clients. Suppose server emits an event send announcement.
io.emit('send announcement');
Similarly a client can also emit an event to server with some data. So to send and event from server to client or from client to server, emit method is used.
io.emit('new message', {message : 'Hello'});
Client emits an event new message and also a message Hello. If you want a client or server to act upon or respond to an event, implement .on method.
socket.on('send announcement', function () {

   .... do stuff here

});
Likewise if a client emits an event and server receives that event using .on method as follows.
socket.on('new message', function (data) {

    console.log(data.message);

    .... do stuff here

});
Adding server side socket.io
First open www file inside bin directory and add this code above server.listen(port) line.
var socketio = require('../lib/socketio');

var io = socketio.io;

io.attach(server);
Create a directory lib inside your project folder. Add a JavaScript file named socketio.js. Open socketio.js.
Update socketio.js file for using socketio with nodejs
/* @description: This file contains server side socket.io code.
 * Using socketio with nodejs

 * Emit and receive events.

* @author: https://programmerblog.net

*/


var socket_io = require('socket.io');

var io       = socket_io();

var socketio = {};

socketio.io  = io;

var users = [];

 io.on('connection', function(socket){

    console.log('A user connected');

    socket.on('join', function (user){

       socket.username = user.username;

       users.push(socket.username);

       io.emit('user joined', { 'username': user.username, users:users });

    });


    socket.on('typing', function (msg) {

        io.emit('typing', { 'message': msg.message, 'username': msg.username });

    });

    socket.on('new_message', function (msg) {

         io.emit('chat message', { 'message': msg.message, 'username': msg.username });

    });

    socket.on('disconnect', function(){

        console.log('user disconnected');

        users.splice(users.indexOf(socket.username), 1);

      io.emit('user disconnected', { 'username': socket.username });

    });

 });

module.exports = socketio;
In the code above first we included socket.io module that is installed using npm. This module is assigned to socket_io variable. Next socket_io() method is a called and is assigned to io variable. A socket object is created and io is attached to a socket via socket.io.
var socket_io = require('socket.io');

var io       = socket_io();

var socketio = {};

socketio.io  = io;

var users = [];
connection event of socket.io
Inside io.on method, connection is passed. This method is called whenever a user is connected to server.
 io.on('connection', function(socket){

 .......

});
Socket’s join event is called when join event is emitted from client side. Note that .on method is used to receive event and data from client side.
socket’s join event
socket.on('join', function (user){

    socket.username = user.username;

    users.push(socket.username);

    io.emit('user joined', { 'username': user.username, users:users });

 });
When join event is emitted from client and is received by server, a user object is passed from server. That contains user name. User name is accessed via user.username and is also assigned to socket.username.
Each username is added to user’s array that is used to keep track of users those are connected to the chat. Lastly in this event Server emits a user joined event to all connected clients and sends back username and all users’s array.
User is typing event on server side
On client side when a user types a message in chat text box, other users are notified that some user is typing. To accomplish this task client emits a typing event that we receive in server side.
  socket.on('typing', function (msg) {

        io.emit('typing', { 'message': msg.message, 'username': msg.username });

});
From client a msg object is receive and server emits a typing event to all connected users with an object containing message and a username.
Receive message from client and send to connected clients
When a connected client types a message and clicks Send button, message is sent to server. Other users can also see message. Emitted event is received in an event called new message. Username and message is received and is emitted to all connected clients.
socket.on('new_message', function (msg) {

        io.emit('chat message', { 'message': msg.message, 'username': msg.username });

   });
User disconnect event
When a user disconnects or closes browser, server receives a disconnect event. Server emits a disconnect event and let all clients know that a user is disconnected and removes username from user’s array.
socket.on('disconnect', function(){

       console.log('user disconnected');

       users.splice(users.indexOf(socket.username), 1);

     io.emit('user disconnected', { 'username': socket.username });

   });
Server side code is completed. Now let us focus on clients side code.

Socket.io client side code
Add client side code for using socketio with nodejs.
Add code in layout.pug
Open layout.pug in views folder. First add bootstarp.css and then style.css. After body and block content, add socket.io library. After this jQuery and a custom JavaScript file chat_scrtip.js is included.
doctype html

html

  head

    title= title

   link(rel='stylesheet', href='https://maxcdn.bootstrapcdn.com/bootstrap/3.3.7/css/bootstrap.min.css')

   link(rel='stylesheet', href='/stylesheets/style.css')

 body

   block content

   script(src='/socket.io/socket.io.js')

   script(src='https://code.jquery.com/jquery-3.2.1.min.js')

  script(src='/javascripts/chat_script.js')
Add code in index.pug
Open index.pug file in views folder and add code below. This is pug template code.
extends layout
block content
.container
.row
h1 Using socket.io with NodeJS
.row
.panel.panel-default
.panel-heading #{title}
.js-userjoined
.js-usersinchat Users in Chat:
.typing
.panel-body
.container#messages
.row.message-bubble
.panel-footer
.input-group
input#txtmessage.form-control(type='text')
span.input-group-btn
button#sendmessage.btn.btn-default(type='button') Send
This code extend the layout code defined abve and ther are diffent divs with bootstart and soem custom classes. Import to noe ere are .js-userjoined to show name oa user hwo jaoind chat
.js-usersinchat Users in Chat: To display all the user present in chat.
.typing To display a message that a user si typeing a message.
Inside panel.bod we defeind amessage containr. blwo it in panel-footer an inuut with txtmesage is is defne so user cna type meeage here. Lastly asend messga ebutton is createsd when user cliks on this buuton message is emittet to server.
Create chat_script.js file
Open javascrtips folder inside public folder. Add code belwo into it.
/* @description: using socketio with nodejs
* This script contains cleitn side functions for socket io chat and emits data to server and receive events and data from
server
*/
var socket = io.connect('http://localhost:3000');

var username = Math.random().toString(36).substr(2,8);
socket.emit('join', { username: username });
socket.on('user joined', function (data) {
$(".js-userjoined").html(data.username + ' Joined chat room');
$.each(data.users, function(index, user) {
$(".js-usersinchat").append('<span id ='+user+'> <strong>'+user+'</strong></span>');
});
});
socket.on('user disconnected', function (data) {

    $("#"+data.username).remove();

});
//an event emitted from server
   socket.on('chat message', function (data) {

       var string = '<div class="row message-bubble"><p class="text-muted">' + data.username+'</p><p>'+data.message+'</p></div>';

       $('#messages').append(string);

   });
$(function () {
var timeout;
function timeoutFunction() {
typing = false;
socket.emit("typing", { message: '', username: '' });
}
$("#sendmessage").on('click', function () {
var message = $("#txtmessage").val();
$("#txtmessage").val('');
$('.typing').html("");
socket.emit('new_message', { message: message, username: username });
});
socket.on('typing', function (data) {
if (data.username && data.message) {
$('.typing').html("User: " + data.username+' '+ data.message);
} else {
$('.typing').html("");
}
});
$('#txtmessage').keyup(function () {
console.log('typing');
typing = true;
socket.emit('typing', { message: 'typing...', username: username});
clearTimeout(timeout);
timeout = setTimeout(timeoutFunction, 2000);
});
});
var typing = false;
var timeout = undefined;
function timeoutFunction(){
typing = false;
socket.emit(noLongerTypingMessage);
}
function onKeyDownNotEnter(){
if(typing == false) {
typing = true
socket.emit();
timeout = setTimeout(timeoutFunction, 5000);
} else {
clearTimeout(timeout);
timeout = setTimeout(timeoutFunction, 5000);
}
}
First include socket.io module and assign it to socket variable. No database or HTML form is used to get or save username. For demo purposes, an alphanumeric username of 6 characters is randomly generated. Username is assigned to username variable.
var socket = io.connect('http://localhost:3000');
var username = Math.random().toString(36).substr(2,8);
Emit user join event and receive user joined event
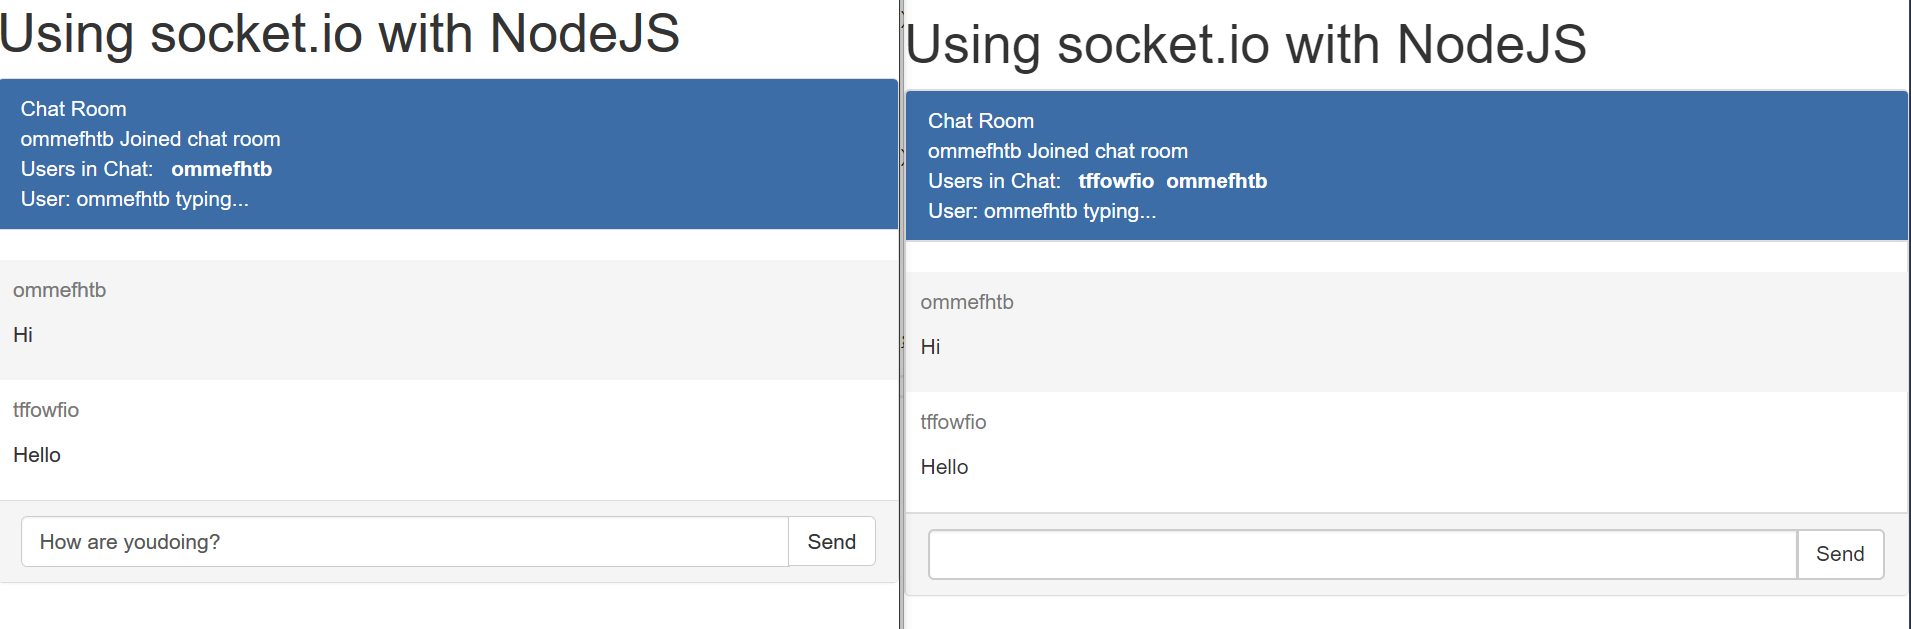
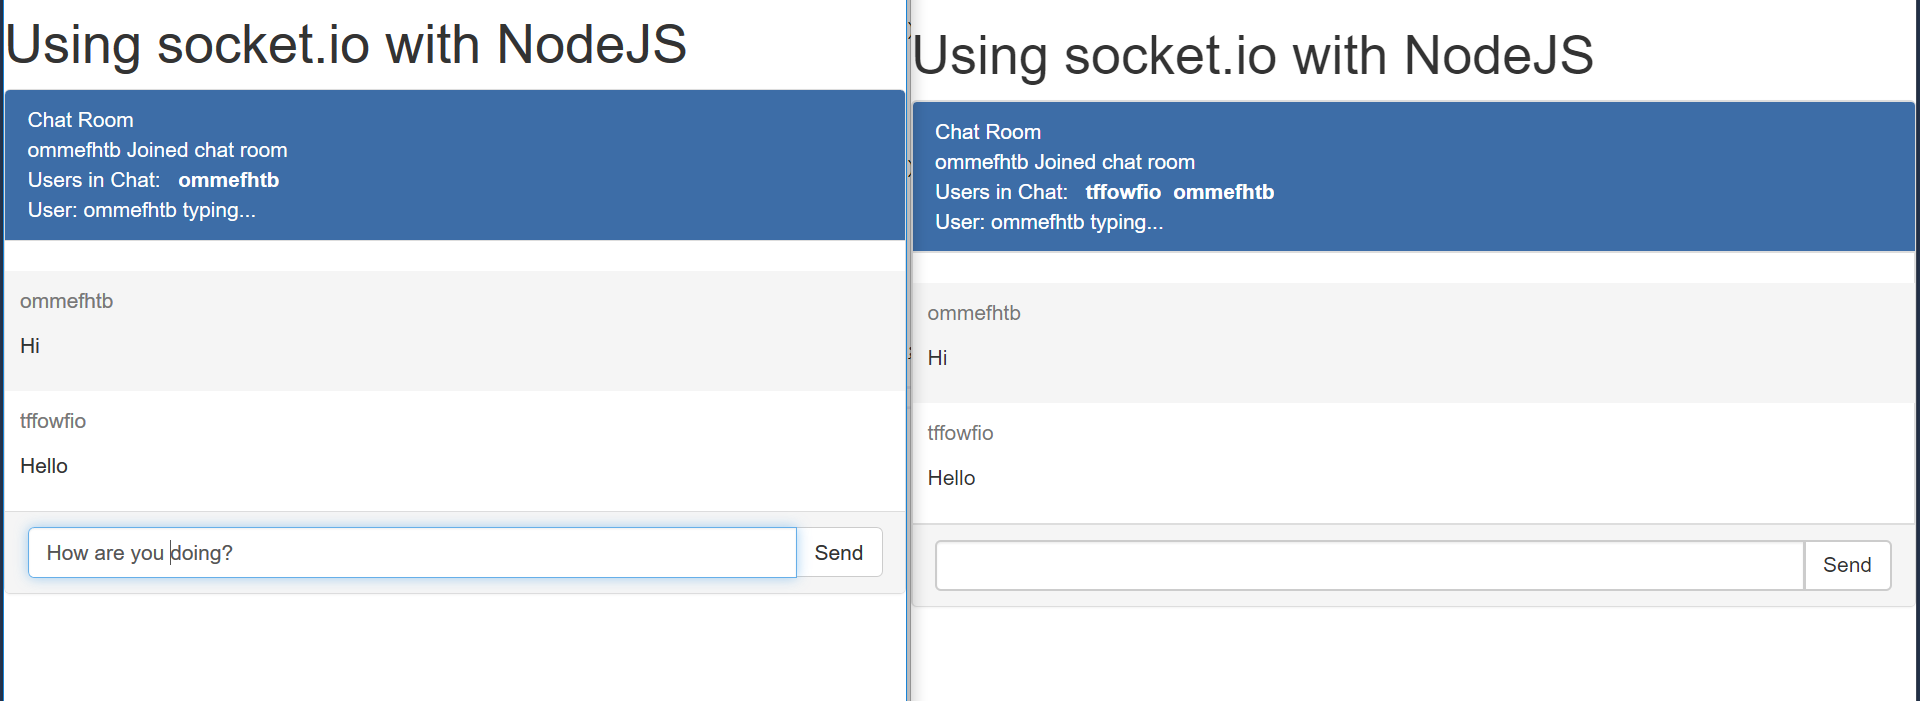
Whenever a user visits chat application, join event is emitted to server. Username is sent to server. Server receives event as described above with username. Then username and users list is sent to all connected clients by server, emitting user joined event.
[username] joined chat room message is shown in a div with class .js-userjoined. Another div displays connected users list. A span for each user is added. Id of each span is a username.socket.emit('join', { username: username });
socket.on('user joined', function (data) {
$(".js-userjoined").html(data.username + ' Joined chat room');
$.each(data.users, function(index, user) {
$(".js-usersinchat").append('<span id ='+user+'> <strong>'+user+'</strong></span>');
});
});
User disconnected event
When a user closes browser or ends chat session, Server receives a Disconnect event. Server emits a user disconnected event to all connected clients with disconnected username. span of this username is removed from div.
socket.on('user disconnected', function (data) {
$("#"+data.username).remove();
});
Receiving user’s messages using socketio with nodejs
When a user sends a message to server. Server receives message from user with username and emits the message and username to all connected users. Client on the other hand, receive an event chat message. In call back function client receives data from server.
Data object contains username and message. Username and message is concatenated in a string and is appended to messages div. Messages are displayed to user.
//an event emitted from server
socket.on('chat message', function (data) {
var string = '<div class="row message-bubble"><p class="text-muted">' + data.username+'</p><p>'+data.message+'</p></div>';
$('#messages').append(string);
});
Sending user message to server using socketio with nodejs
User message is sent to server, when a user types a message in the message box and clicks Send button.
$(function () {

  .....

});
In JavaScript file jQuery ready function is defined. Functions are declared to send messages and show user typing status to all other connected users. When send button is clicked, message from txtmessage text box is assigned to message variable. new_message event is emitted to server with username and a message.
User is typing event
To show all users a message that user is typing. keyup event of text box is called. When user presses a key while typing a message, typing variable is set to true; then typing event is emitted to server with a message that says typing …. and username.
After that cleartimeout method is called. Lastly timeout method is defined. This method is called every 2 seconds and emits an typing event.
var timeout;

 $("#sendmessage").on('click', function () {

   var message = $("#txtmessage").val();

   $("#txtmessage").val('');

   $('.typing').html("");

   socket.emit('new_message', { message: message, username: username });

 });

 $('#txtmessage').keyup(function () {

     console.log('happening');

     typing = true;

     socket.emit('typing', { message: 'typing...', username: username});

     clearTimeout(timeout);

     timeout = setTimeout(timeoutFunction, 2000);

 });

function timeoutFunction() {

      typing = false;

      socket.emit("typing", { message: '', username: '' });

  }
User is typing implementation in using socketio with nodejs
Now to implement user is typing feature on client side, receives typing event from server. Client checks if username and message exists. HTML with username and message is assigned to a div with .typing class. Otherwise blank div is displayed. Lastly a timeout method is implemented.
socket.on('typing', function (data) {

        if (data.username && data.message) {

            $('.typing').html("User: " + data.username + ' ' + data.message);

        } else {

            $('.typing').html("");

        }

    });

var typing = false;

var timeout = undefined;

function timeoutFunction(){

  typing = false;

  socket.emit(noLongerTypingMessage);

}
Running chat application
Now finally to run this app, go to project folder on command line. Type following command.
node bin/www
Open browser and in address bar type following URL.
http://localhost:3000
Summary
To summarize, in this tutorial you have created a real time chat application using socketio using nodejs. Implemented send and received message feature, informed other user when a user joins chat room with users list. User is typing functionality is also implemented.
You can download source code of this tutorial from this GitHub Repository.

Please leave your feedback and comments. Follow us on twitter to get updates on latest articles.
Related Articles:
- NodeJS loopback RESTful api
- Nodejs authentication with jwt
- Nodejs MongoDB CRUD tutorial
- Nodejs MySQL pagination example
- Generate RSS Feed using NodeJS
Previous Article: Generate PDF using NodeJS
Next Article: NodeJS Mongodb RESTful API